You might remember this photo from an update on our bathroom renovation. The large hole is an old medicine cabinet {I’m guessing} and the torn-up walls are due to the glue that was on the back of the large vanity mirror.

Disclosure: This page includes affiliate links.
The other 3 walls were in much better shape, but still needed plenty of spackling paste to cover small blemishes. The wallpaper was removed pretty carefully {and most definitely, slowly} but some dings still occurred.
 |
| pink spots are spackling paste on the wall before it dried |
However, after lots of sanding, spackling, priming, etc. we have walls that are looking much improved.

I won’t be sharing a tutorial today, because we are beginners and are learning as we go. However, I thought I’d share a bit about what tools we are using, what has worked well, and what hasn’t worked.
{note: We do intend to fill those big holes in the photo above with new drywall; but I’m not including it in general “drywall repair”… if we are lucky and it goes smoothly, maybe I’ll share about replacing that drywall next week. Wish us luck!}
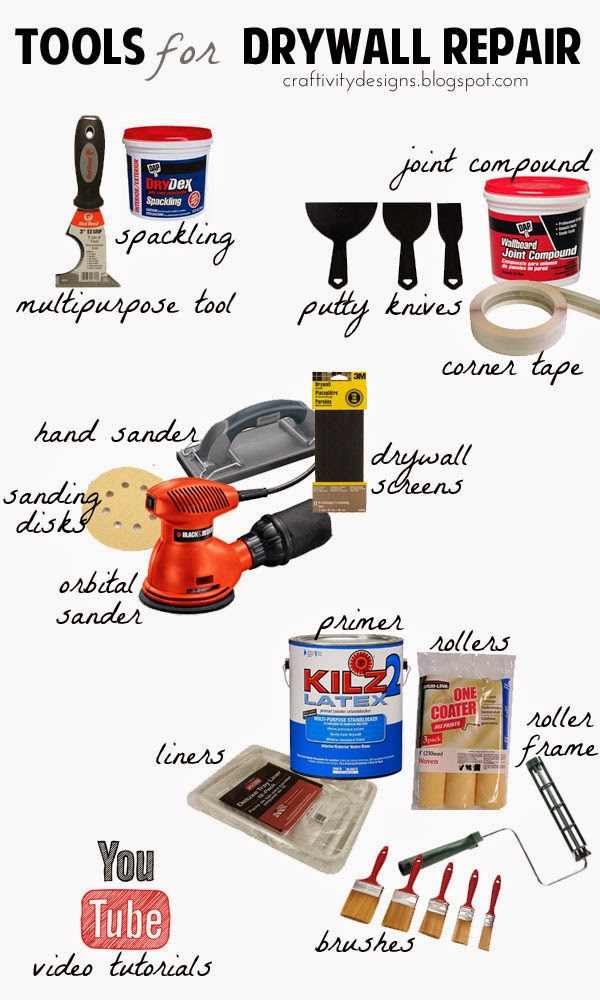 |
| spackling // multipurpose tool // corner tape // joint compound // putty knives // orbital sander // sanding disks // hand sander // drywall screens // primer // brushes // roller frame // rollers // liners // video tutorials |
Spackling – I like DryDex spackling. It goes on pink; but dries white. You can ask Mike, I can be horribly impatient. This little visual cue keeps me from sanding before the spackling is completely dry.
Multipurpose Tool – You MUST buy one of these multipurpose tools if you don’t already own one. We currently have 3 of them and use them for everything from removing wallpaper, to prying off old caulk and popping off stubborn lids. Of course, in this case, I used it to apply the spackling. FYI: These will rust if you don’t clean off the blade immediately after using the tool.
Corner Tape – The outside corners in the bathroom were really banged up after removing wallpaper. We are using FibaTape Drywall Corner Tape, along with joint compound to repair them. The tape easily cuts and bends to create your new “corner.” We used this video tutorial as a guide.
Joint Compound – Our first try at fixing the outer corners was unsuccessful. We used only joint compound and no corner tape. The goal was to apply enough joint compound to cover the corners and then smooth it; but this was nearly impossible. If we applied it thin, the damaged corner would show through the joint compound. If we applied it liberally, then we couldn’t get the wall and corner smooth again.

We learned from several tutorials that adding a small amount of water to the joint compound made it much easier to spread. This, in combination with the corner tape, made it SO. MUCH. EASIER.
Putty Knives – Plastic putty knives are inexpensive and great for applying the joint compound {as well as removing wallpaper}.
Orbital Sander & Sanding Disks – Sand your walls easily and quickly with an orbital sander. I finished the first two walls with a hand sander and then finally dug my orbital sander out of storage. This was silly, it was so much faster and I should have gotten it out in the first place. You will need some sanding disks as well. Note: The actual orbital sander we own seems to be discontinued, so I’ve linked to a similar sander on Amazon that is affordable and a bestseller.
Hand Sander & Drywall Screens – If you don’t want to invest in an orbital sander, a hand sander is still a good tool. Even though it took me longer to complete those first two walls, it was easy to use and didn’t strain my arms too much. It has a really good weight and the drywall screens {aka: the sandpaper} stay in place.
Primer – Since our walls had suffered quite a bit of damage, I bought KILZ Stainblocking Primer. KILZ is always a good primer in my opinion — and I wanted to ensure that we ended up with a nice even surface with no discoloration seeping through the paint.
Brushes – Typically I buy inexpensive sets of brushes like this one, especially for basic paint projects like priming walls. That way if they aren’t cleaned perfectly we haven’t wasted much money.
Roller Frame, Rollers & Liners – Of course, you will need a roller frame and rollers to apply the primer to the walls. In a room like this one, I will usually roll two coats of primer, even if I don’t edge with a brush twice. It’s just so important to get a nice clean finish before painting — and it doesn’t take much time to roll a second coat. Typically I use liners {without a tray} because it’s easy.
Video Tutorials – Seriously, what would Mike and I do without YouTube video Tutorials? I love reading blogs to educate myself before starting a project. However, once I’m in the middle of the project YouTube is my go-to-spot to see an example of a process. Just like the video I mention earlier about applying drywall corner tape.
So, have you repaired drywall before? Did you use any other tools? I’m still sanding and priming… and have many more rooms to de-wallpaper… so I’d love to hear any other tips!
Mint Mirror Makeover for the Entry Way – Craftivity Designs
Thursday 29th of April 2021
[…] Removing wallpaper is not the most inspiring or creative endeavor… so yesterday, even though there is more work to be done in the bathroom I took a break to paint this mirror and make it pretty. […]