Back in July, Erica included this clay chalkboard from Kirsten in a Kick Off Friday roundup. I loved the idea, pinned it and — 4 months later — I did it!
Disclosure: This page includes affiliate links.
Kirsten explains how she went about creating her chalkboards, but I had never worked with Sculpey clay before. I learned a few things along the way and switched up a few things as well.
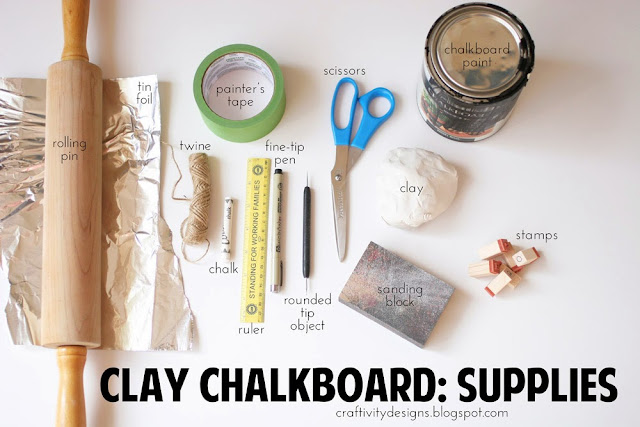
The supplies were pretty simple, and I had most of them in my craft stash already.
Supply List:
- Sculpey Clay (a 3.75lb case could easily make 8 – 6″x6″ chalkboards)
- Rolling Pin
- Ruler
- Alphabet Stamps
- Something with a Round Tip (like a pen)
- Cookie Sheet
- Aluminum Foil
- Fine Tip Marker
- Sand Paper
- Painter’s Tape
- Chalkboard Paint
- Chalk
- Twine
How To:
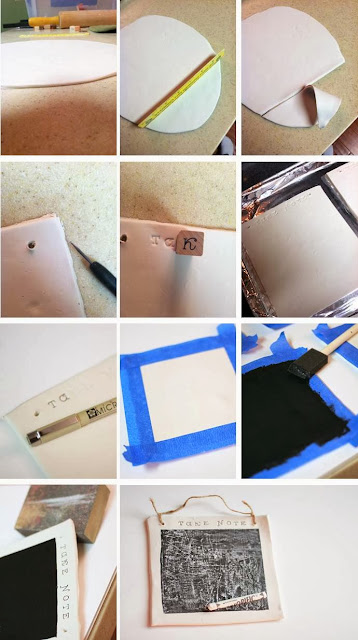
- Grab a handful of clay. It will be crumbly at first; but will smooth out as you knead it and it warms up in your hands.
- Flatten with a rolling pin. It should be approximately the thickness of two quarters.
- Use a ruler {or another hard, straight edge} to cut out your chalkboard.
- Poke two holes in the clay with a pen, or other rounded tip.
- Press the letter stamps into the clay.
- Cover a cookie sheet with aluminum foil and place the clay chalkboard onto the foil.
- Bake at 275 for approximately 25 minutes {I would suggest on your first try, check it every 10 minutes to make sure the clay isn’t yellowing}
- Remove when the chalkboard is “hard” but not yellow. It will never become hard and rigid. It is more of a flexible hardened — kind of like those little clay Christmas ornaments, like this one, that have a bendable-ness to them. Does that make sense?
- Let cool.
- Use a fine tip marker to highlight the stamped letters.
- Tape a square and paint with chalkboard paint.
- Let dry.
- Sand down the edges of the clay chalkboard.
- Season with chalk to prep the chalkboard.
- String with twine to hang.
I’ve been playing around with mine. Here’s is what I need to Mike needs to pick up at the store.
And what is on our Thanksgiving Menu.
And what I’m looking forward to decorating in our new home.
Oh — and I bought almost 4 lbs of the Sculpey Clay, so I’ve been searching for some more clay crafts. It was really easy to work with and now I just need to choose which of these cute ideas I’ll be trying next!
 |
| Gift Topper // Label // Ornament // Snowflake // Kitchen Utensils // Alphabet // Bunting // Keys // State |
Have you ever used Sculpey Clay? What did you make?
The winner of our giveaway is Sherry Y. {an email is already on it’s way}! Thanks so much to everyone who participated.


How to Make Watercolor Easter Eggs – Craftivity Designs
Friday 21st of January 2022
[…] easy to work with, kid-friendly, and sooooo versatile. After all, I’ve made everything from chalkboards to ring dishes and Christmas ornaments with Sculpey Clay. If you are itching to try out clay […]
How to Make a DIY Thumbprint Ring Dish – Craftivity Designs
Sunday 18th of April 2021
[…] used Sculpey Clay a few times before {for a chalkboard, number tags, hand print and dog bone ornaments} and it’s a very easy-to-use crafting […]
Craftivity Designs
Friday 27th of December 2013
Thanks so much, Abby! I've really enjoyed the themed linkups you all have been hosting -- both as a participant and to check out others' great ideas and the features. Glad you stopped by :)
Abby at Just a Girl and Her Blog
Tuesday 24th of December 2013
I love this! What a unique way to use chalkboard paint! So, so cute! Thanks so much for sharing at Get Your DIY On! I hope to see you back on Sunday at 7 pm EST to link up any of your favorite projects! Have a wonderful weekend!
~Abby =)
Craftivity Designs
Monday 2nd of December 2013
I love your Etsy Shop and reading about your craft booths! I was glad to include them in this clay roundup :)