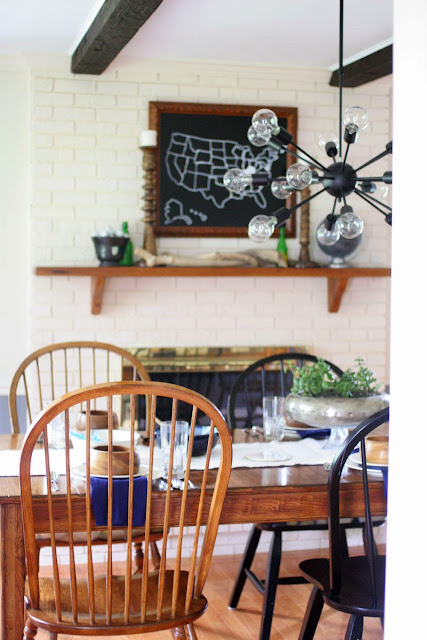
So, let’s talk about our ceiling light. It’s a sputnik style light, with a more affordable price tag.
If you’ve ever shopped for “Sputnik” chandeliers before, you know that they aren’t cheap. They typically start in the $300 range and run well over $1000 depending on the size. However, there are some more affordable options available — including the one that we chose for our Dining Room.
I did some research prior to purchasing this light.
First, I checked several guides about the appropriate size for a chandelier based on the dimensions of the room and table — which suggested a chandelier around 30″-36″ in diameter. That isn’t a small light… which means a higher price tag.
Second, we considered our style. We mulled over several options in this post and our favorite was the 10-Light Downtown Chandelier; but it was marked at over $500. It had an industrial feel and exposed bulbs, so I started to search for chandeliers with that same style.
This one from Amazon has that industrial vibe; and the bronze color is better for our space. If we’d chosen a nickle or chrome finish there wouldn’t have been as much contrast against the white fireplace.
This light looks great and gives the room plenty of light. We bought 25-watt bulbs which keeps it from feeling too bright. I chose to skip the “vintage bulbs” because I didn’t want a yellow cast in the room and because they were around $6-8 each. This chandelier has 18 lights…. so we would have been talking at least another $100 for light bulbs. Instead, the clear bulbs are less than $1 each.
There was a happy accident with this light. The hole in the ceiling was slightly too big, so we bought a ceiling medallion. It was a practical purchase; but I love the look. We bought this one at Lowes; but I can’t find it online… it was around $15 or less.
Now, this light wasn’t all roses. The assembly and installation instructions were incredibly basic… to be generous.
This led to us non-electricians having to {1} ask lots of questions at the hardware store, {2} research online, {3} try several products and {4} repeat — before getting it put together. Mike finally figured it all out and, my goodness, it was exciting to see those bulbs light up!
So — be aware — if you aren’t interested in decoding poorly written instructions and don’t have much electrical expertise this may not be the light for you. Of course, you could always hire someone to install it, as well.
In case this light has peaked your interest, but isn’t the right one for you; here are a few other affordable options.
#1: Small 12-Light Chrome Pendant $193
#2: 18-Light Brushed Nickel Chandelier $193
#3: Fine Mod Spark Chandelier $217
#4: 24-Arm Sputnik Starburst Chandelier $249
#5: Small 12-Light Sputnik Pendant $175
Are you in the market for a chandelier? If so, what style{s} are you considering?


How to Choose a Living Room Light for Low Ceilings (Stunning Semi-Flush Mount) – Craftivity Designs
Monday 17th of January 2022
[…] Affordable Sputnik Chandelier for a Dining […]
MKJ
Monday 30th of November 2015
Hi! Love this post! I do have a question about the light that it gives off now that it is installed in your home. Is it bright? Sufficient lighting on the table? Does it light the room beyond the table? Thank you
craftivitydesigns@gmail.com
Monday 30th of November 2015
It is bright. We actually only used 25 watt bulbs because we were afraid it would be too bright (8' ceilings, room is about 11 x 21 ft), which worked out really well. It is plenty bright enough -- and does light the adjoining rooms some as well -- without feeling too bright.
Svetlana Itsbetsky
Tuesday 24th of November 2015
Thanks for you putting the instructions on how you connected wires. In final assemble you are connected the two red wire (the puggy backs) two the ceiling wires? Only 1 red per black and white?
Thanks you!
craftivitydesigns@gmail.com
Monday 30th of November 2015
Sorry it took me a few days to reply -- we were out of town. Correct, only 1 tied into each black & white ceiling wire.
Craftivity Designs
Wednesday 22nd of July 2015
Hi Silvia! I apologize that it took me several days to reply. Here are a few tips...
(1) we bought new wire nuts because the ones in the box were not sufficient (2) we placed 3 white {or 3 black} into each wire nut (3) we bought additional wire in a similar gauge -- it's red in the image above -- to connect each "white wire" nut to the next "white wire" nut {and the same on the opposite side with black, of course} (4) this resulted in each wire nut having 4 wires going in {3 white/black and 1 red(5) the red wire acts as a "pigtail" branching off to the next nut and continuing to carry that current from one set of white wires to the nextWe got to this solution after a bunch of Google-ing and talking with our local hardware store.I hope that helps!
Let me know if you have any other questions. You can also email craftivitydesigns @ gmail.com
NOTE: We aren't electricians -- so be safe and take proper precautions. Proceed at your own risk.
Silvia Diaz
Saturday 18th of July 2015
I just got this light and am having the same issues with the installation instructions. I usually dont shy away from electrical work but this one seems complicated. Taking a closer look at the picture you posted with the wiring but any additional information you can share is more than welcome! Thanks in advance!!!