
How to Make a Clay Chalkboard
Back in July, Erica included this clay chalkboard from Kirsten in a Kick Off Friday roundup. I loved the idea, pinned it and -- 4 months later -- I did it!

Disclosure: This page includes affiliate links.
Kirsten explains how she went about creating her chalkboards, but I had never worked with Sculpey clay before. I learned a few things along the way and switched up a few things as well.
The supplies were pretty simple, and I had most of them in my craft stash already.

Supply List:
- Sculpey Clay (a 3.75lb case could easily make 8 - 6"x6" chalkboards)
- Rolling Pin
- Ruler
- Alphabet Stamps
- Something with a Round Tip (like a pen)
- Cookie Sheet
- Aluminum Foil
- Fine Tip Marker
- Sand Paper
- Painter's Tape
- Chalkboard Paint
- Chalk
- Twine
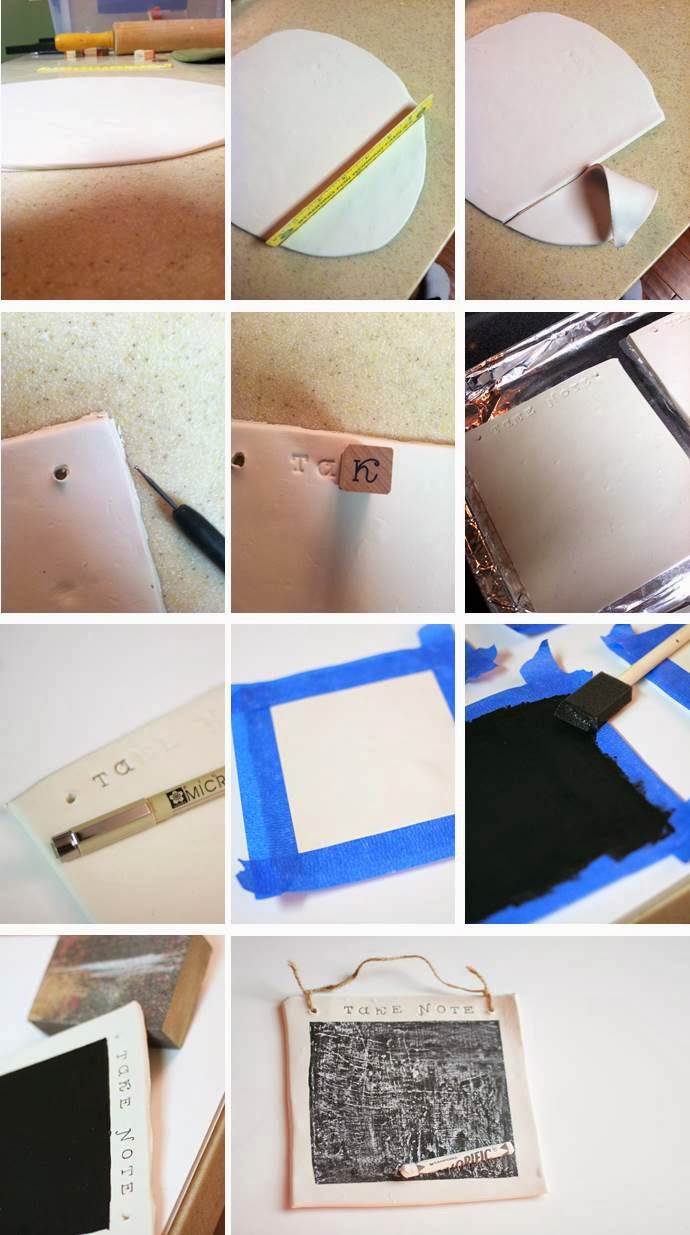
How To:
- Grab a handful of clay. It will be crumbly at first; but will smooth out as you knead it and it warms up in your hands.
- Flatten with a rolling pin. It should be approximately the thickness of two quarters.
- Use a ruler {or another hard, straight edge} to cut out your chalkboard.
- Poke two holes in the clay with a pen, or other rounded tip.
- Press the letter stamps into the clay.
- Cover a cookie sheet with aluminum foil and place the clay chalkboard onto the foil.
- Bake at 275 for approximately 25 minutes {I would suggest on your first try, check it every 10 minutes to make sure the clay isn't yellowing}
- Remove when the chalkboard is "hard" but not yellow. It will never become hard and rigid. It is more of a flexible hardened -- kind of like those little clay Christmas ornaments, like this one, that have a bendable-ness to them. Does that make sense?
- Let cool.
- Use a fine tip marker to highlight the stamped letters.
- Tape a square and paint with chalkboard paint.
- Let dry.
- Sand down the edges of the clay chalkboard.
- Season with chalk to prep the chalkboard.
- String with twine to hang.
I've been playing around with mine. Here's is what I need to Mike needs to pick up at the store.

And what is on our Thanksgiving Menu.

And what I'm looking forward to decorating in our new home.

Oh -- and I bought almost 4 lbs of the Sculpey Clay, so I've been searching for some more clay crafts. It was really easy to work with and now I just need to choose which of these cute ideas I'll be trying next!
 |
| Gift Topper // Label // Ornament // Snowflake // Kitchen Utensils // Alphabet // Bunting // Keys // State |
Have you ever used Sculpey Clay? What did you make?
The winner of our giveaway is Sherry Y. {an email is already on it's way}! Thanks so much to everyone who participated.


This is so sweet. I want to get some clay and make these and also try little dishes. Thanks for sharing at Silver Pennies Sundays. x
Little dishes would be so cute, Danielle. You could add little details in them with decorative stamps too!
Lovely...I'm making chalkboard birds as we speak. Thanks for sharing my clay tags/ornaments!
I love this! You've been featured on Sunday Features {Give Me The Goods}. You'll also be on my FB page today.
Hugs,
Jamie @ somuchbetterwithage.com
Thanks so much Jamie!!
I love your Etsy Shop and reading about your craft booths! I was glad to include them in this clay roundup 🙂
I love this! What a unique way to use chalkboard paint! So, so cute! Thanks so much for sharing at Get Your DIY On! I hope to see you back on Sunday at 7 pm EST to link up any of your favorite projects! Have a wonderful weekend!
~Abby =)
Thanks so much, Abby! I've really enjoyed the themed linkups you all have been hosting -- both as a participant and to check out others' great ideas and the features. Glad you stopped by 🙂