
How to Make a Portable Sandbox
A DIY portable sandbox is a great, mess-free activity for your kids. Learn how to make a portable sandbox and keep them entertained for hours!
My son has been getting his hands dirty this summer. He's been building sandcastles, burying treasures, and driving toy trucks around on mounds of dirt... right outside our back door, on the deck. How was he able to do those things on our deck? All because of our DIY portable sandbox!

**Note: This post was originally written as a guest post for Beauty in the Mess.
If you've got a young child, this project is a must-do. Not only does it keep my son entertained for hours, but it's a fairly mess-free way to play in the sand.
How to Make a Portable Sandbox
Supplies Needed
- Plastic Storage Box
- Baking Pan with Lid
- Kinetic Sand
- Small Bins, such as Strawberry Baskets
- Small Toys, such as a Small Sand Toy Kits designed for Kinetic Sand
Instructions
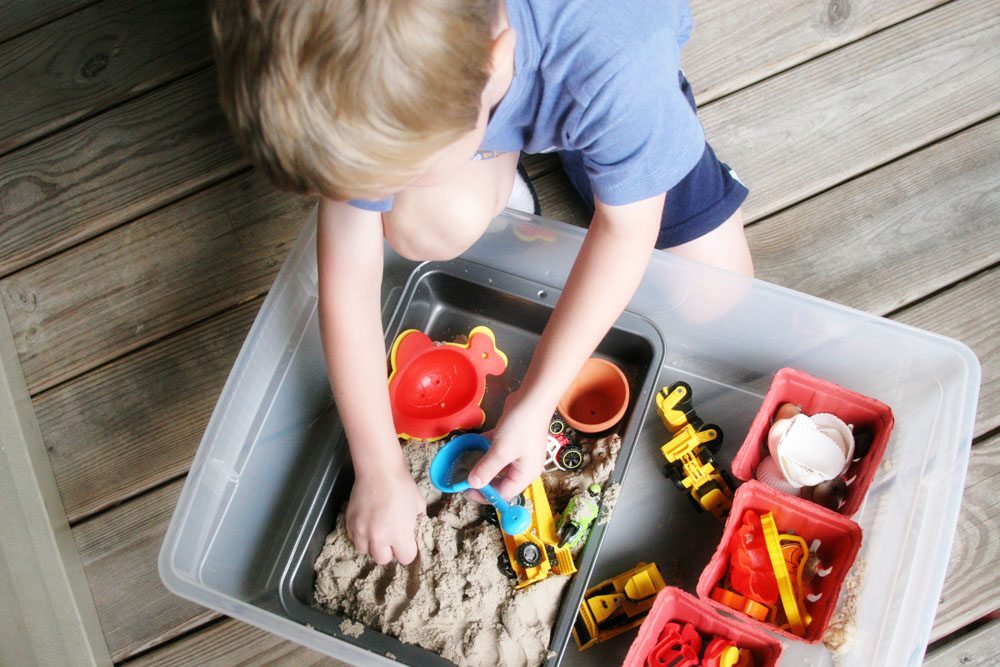
#1. First, fill a baking pan with kinetic sand. Kinetic sand doesn't stick to you, it sticks to itself! We love this stuff for days when playing in the "big sandbox" isn't an option due to weather.
Kinetic sand is mess-free enough that the kids can even play indoors. Like play-doh, you might have to sweep up some stray sand afterward; but, overall, a portable sandbox with kinetic sand stays pretty tidy.

#2. Next, fill small bins - such as plastic strawberry baskets - with toys. Our portable sandbox includes alphabet magnets, a construction set, and small sand toys.
I also tossed in several items from nature, such as seashells and rocks. Truthfully, the sky's the limit here! What are your child's interests? What are they learning in school? Find objects that reinforce those concepts and encourage creative play.

#3. Finally, set the baking pan and the strawberry baskets into a large storage tote. This step accomplishes 3 things:
- makes the sandbox portable (and the toys, too!)
- reduces the mess (if sand falls out of the baking pan, it lands in the storage tote - not on the floor!)
- allows the sandbox to be stored indoors or outdoors.
We store our portable sandbox outside, right under the outdoor bar. Since the portable sandbox is tucked into a plastic tote, it can handle the elements.

UPDATE: While the tote is durable, painting the lid - as shown in the photos - did not last. Therefore, leave the tote as-is if you intend to store it outside.

How to Make a Portable Sandbox
A DIY portable sandbox is a great, mess-free activity for your kids. Learn how to make a portable sandbox and keep them entertained for hours!
Materials
Instructions
- Empty the kinetic sand into a baking pan, and close the lid.
- Fill small bins - such as plastic strawberry baskets - with toys.
- Set the baking pan and the strawberry baskets into the large storage tote and close the lid.
That looks great! I bet my parents would have preferred to have that instead of installing an actual sandbox when my sister and I were little.
Amelie | http://awanderersadventures.wordpress.com
Thanks, Amelie! Yes, so much easier!
This is SUCH a genius idea. We have a large sandbox and I spend sooooo much time cleaning up sand from quite literally everywhere. And once you think it's all clean, they take off their clothes and more comes raining down! Love this idea!
LOL, I totally understand. This thing has been awesome and my son LOVES it 🙂
This is such a brilliant idea! Seriously! I love getting messy but in a container is the perfect way to bring the fun inside!
Thanks, Tiffany 🙂 It's been convenient, for sure!
I jumped over and commented there. It's a great idea Lora. 🙂
Thanks for visiting her site and saying "hi!"
This looks really fun and easy! I'll be passing this along to someone I think will love this!
Thanks for sharing!
What a great idea! We have a small balcony, it would be perfect there!
That's true! I hadn't thought about that, but it would be great for apartments, townhomes and condos, where outdoor space might be a little tighter.