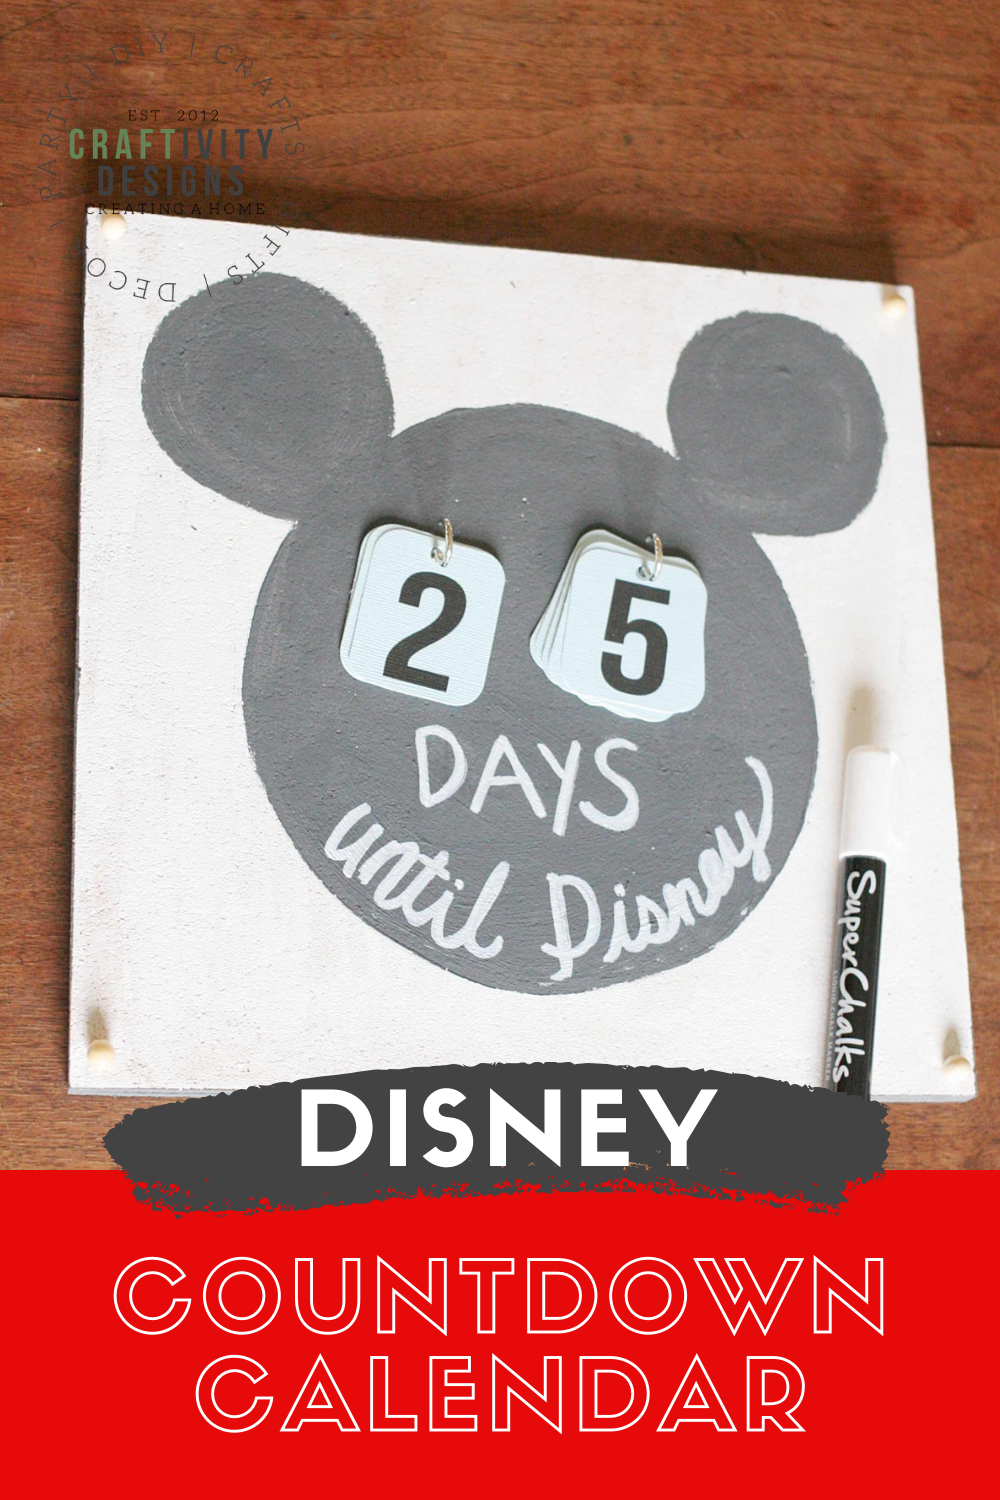
Learn how to make a Disney Countdown Calendar for your next Disney Vacation. Watch the video tutorial and download the printable to countdown to the trip.
Ya’ll, we are going to Disney World this fall! If you don’t know, kids are free before three. This is something we took advantage of with our son (a trip at 2.5-years-old); and we will be doing the same this year, with our 2.5-year-old daughter. Planning is already taking place and we are building up the excitement with a DIY Disney Countdown Calendar.
Let’s be honest, the kids aren’t the only folks in this house who are ready to start this countdown. Am I right?! This week, I’ve been working on our dining reservations… making autograph books for Meet and Greets… and creating a World Showcase Passport for Epcot. I can’t get Disney off my mind. Do any other adults get this excited about taking their kids to Disney? I’m sure I’m not the only one…

**Note: This post was originally written as a guest post for Beauty in the Mess
I completed this project in an afternoon, while my son was working on his homeschool. The kids enjoyed watching it come to life — and you can watch the Disney Countdown come to life in the video.

How to Make a Disney Countdown Calendar
This project uses one of my favorite crafting go-to products: a chalk marker. I love Super Chalks pens and have used them in many non-chalkboard projects, such as updating a wooden bowl and a console table. Of course, Super Chalks also work well for actual chalkboards like our US Map and prayer board. Plus, the markers come in an array of colors.
Disclosure: This blog post contains affiliate links for products or services.
Supplies Needed
- 2 12×12 Cork Tiles
- 4 Push Pins
- 2 Cup Hooks
- Chalk Marker
- White Craft Paint
- Black Craft Paint
- Foam Paint Brushes
- Cardstock
- Numbers 1-9 Printable (download it in step #4)
Tools Needed
- Pencil
- Paper Trimmer or Scissors
- Hole Punch
- Corner Rounder
- Salad Plate
- Drinking Glass
- Printer and Ink
Instructions
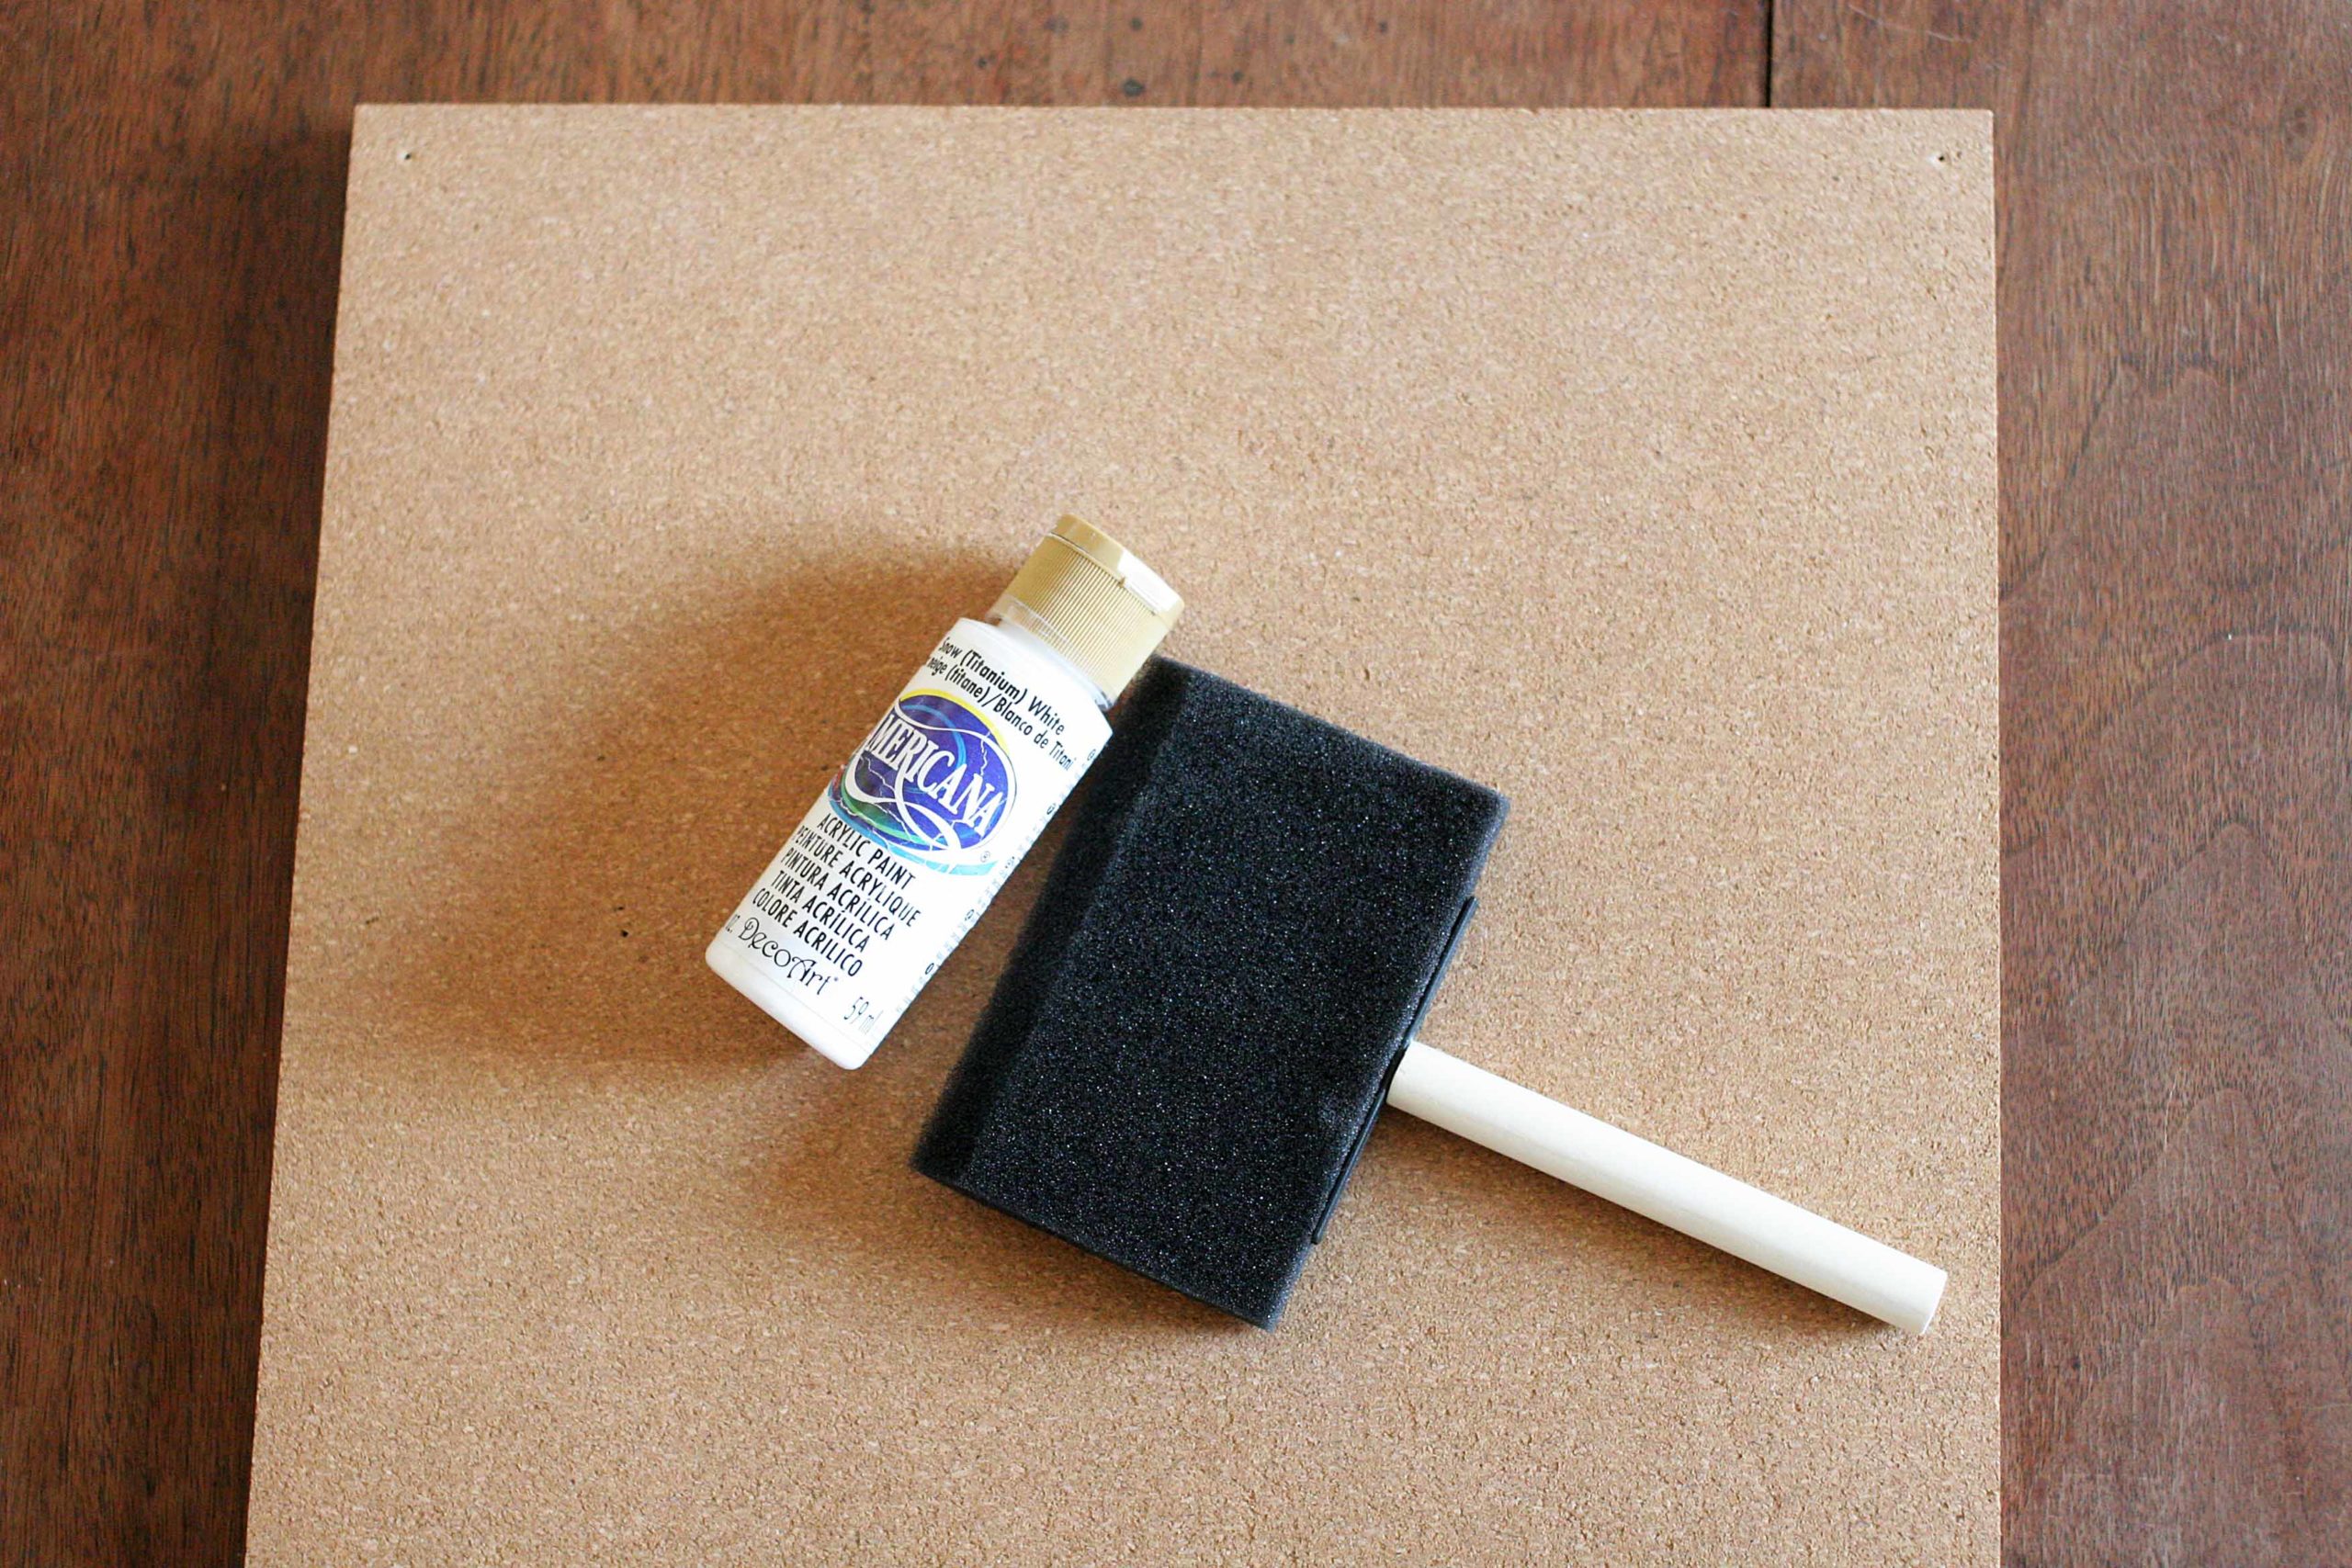
#1: Paint the Background White
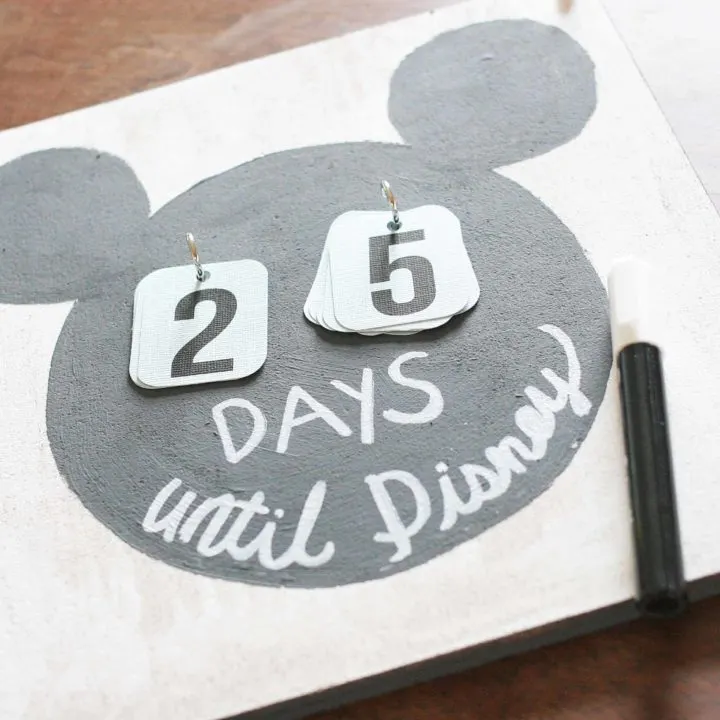
First, choose one of the 12×12 cork tiles and paint the front white. This will be the background for the Disney countdown image (Mickey’s head!).
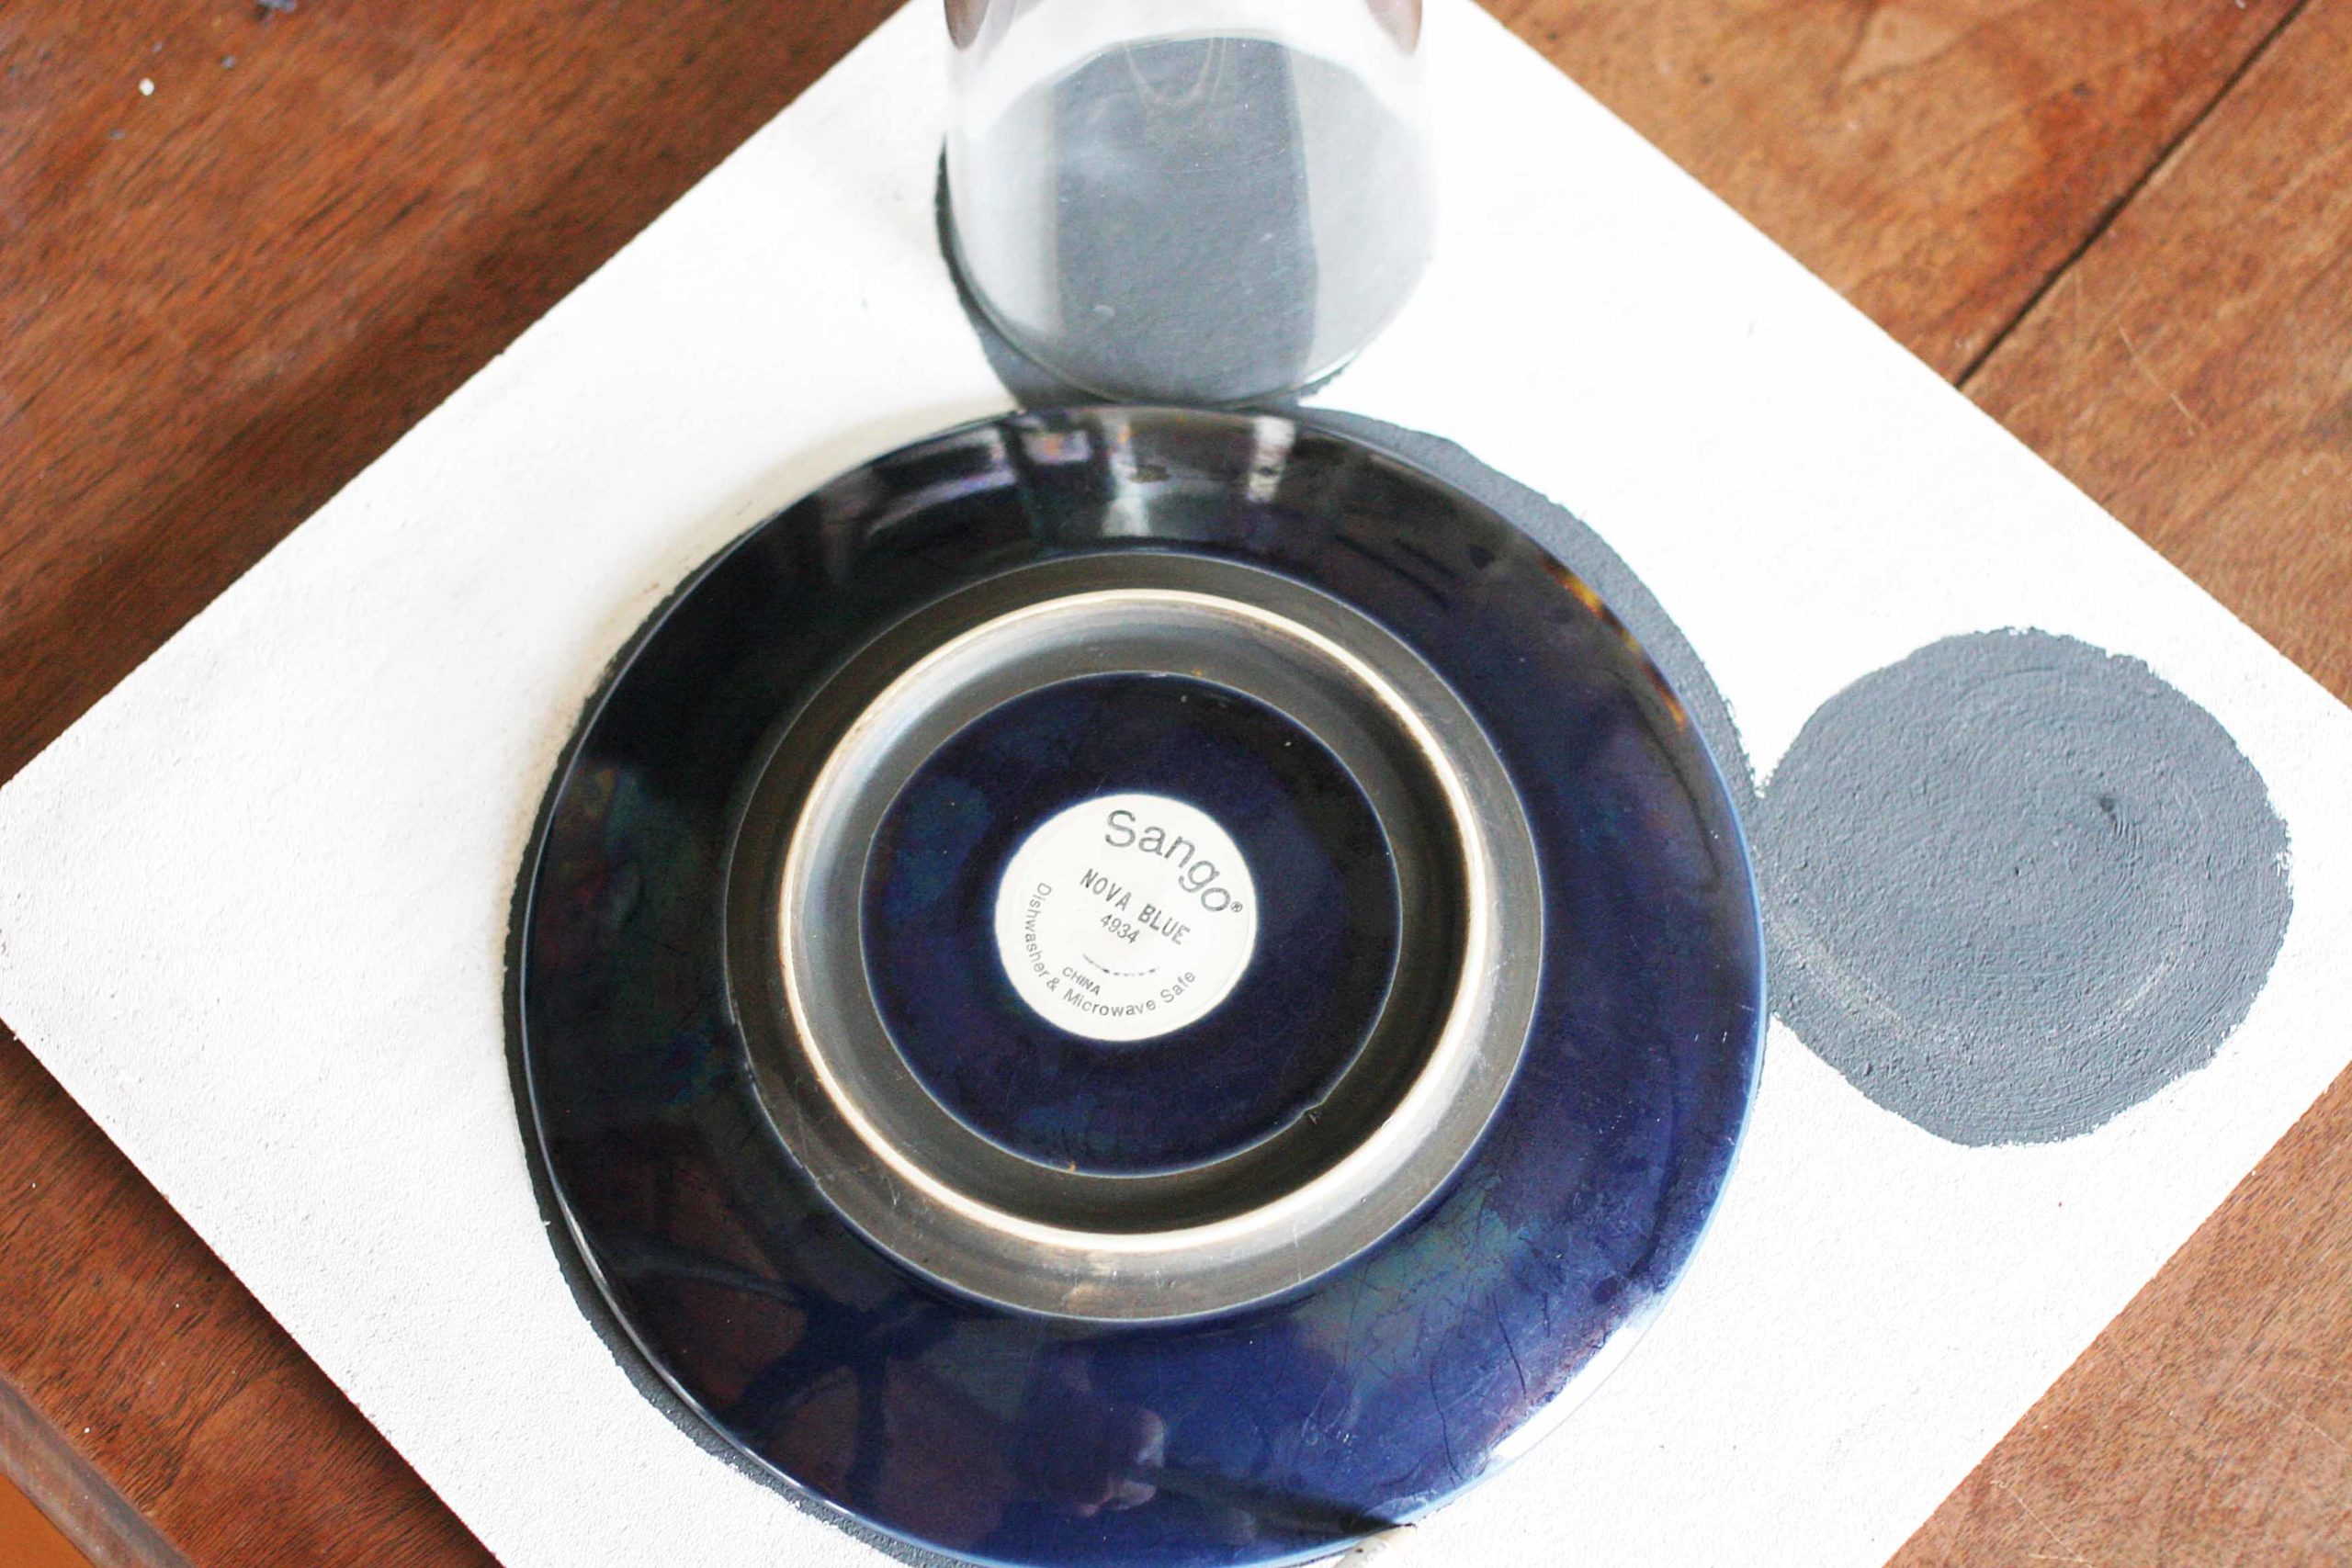
#2: Draw Mickey’s Head
Once the white paint is dry, draw Mickey’s head with a pencil. Use a salad plate to shape Mickey’s face and a drinking glass to shape ears.
#3: Paint Mickey’s Head
Use a foam paintbrush, dipped in black paint, to paint Mickey’s head. Use the pencil lines as a guide.
#4: Download and Print the Countdown Numbers
Download and print the countdown numbers, below. Choose white or colored cardstock, whichever is your preference. I picked blue cardstock because blue fits well with our decor.
Would you like to download the free printable? Click the button, below, to sign up for our newsletter and gain access to the freebie library. Once subscribed, you will receive an email with instructions to access the library.
If you have any problems signing up, please send an email to loragreen@craftivitydesigns.com, and I will sign you up manually.
#5: Cut and Trim the Countdown Numbers
Once printed, cut out each number with a paper trimmer (or scissors). Trim the corners with a paper rounder for a clean, finished look.
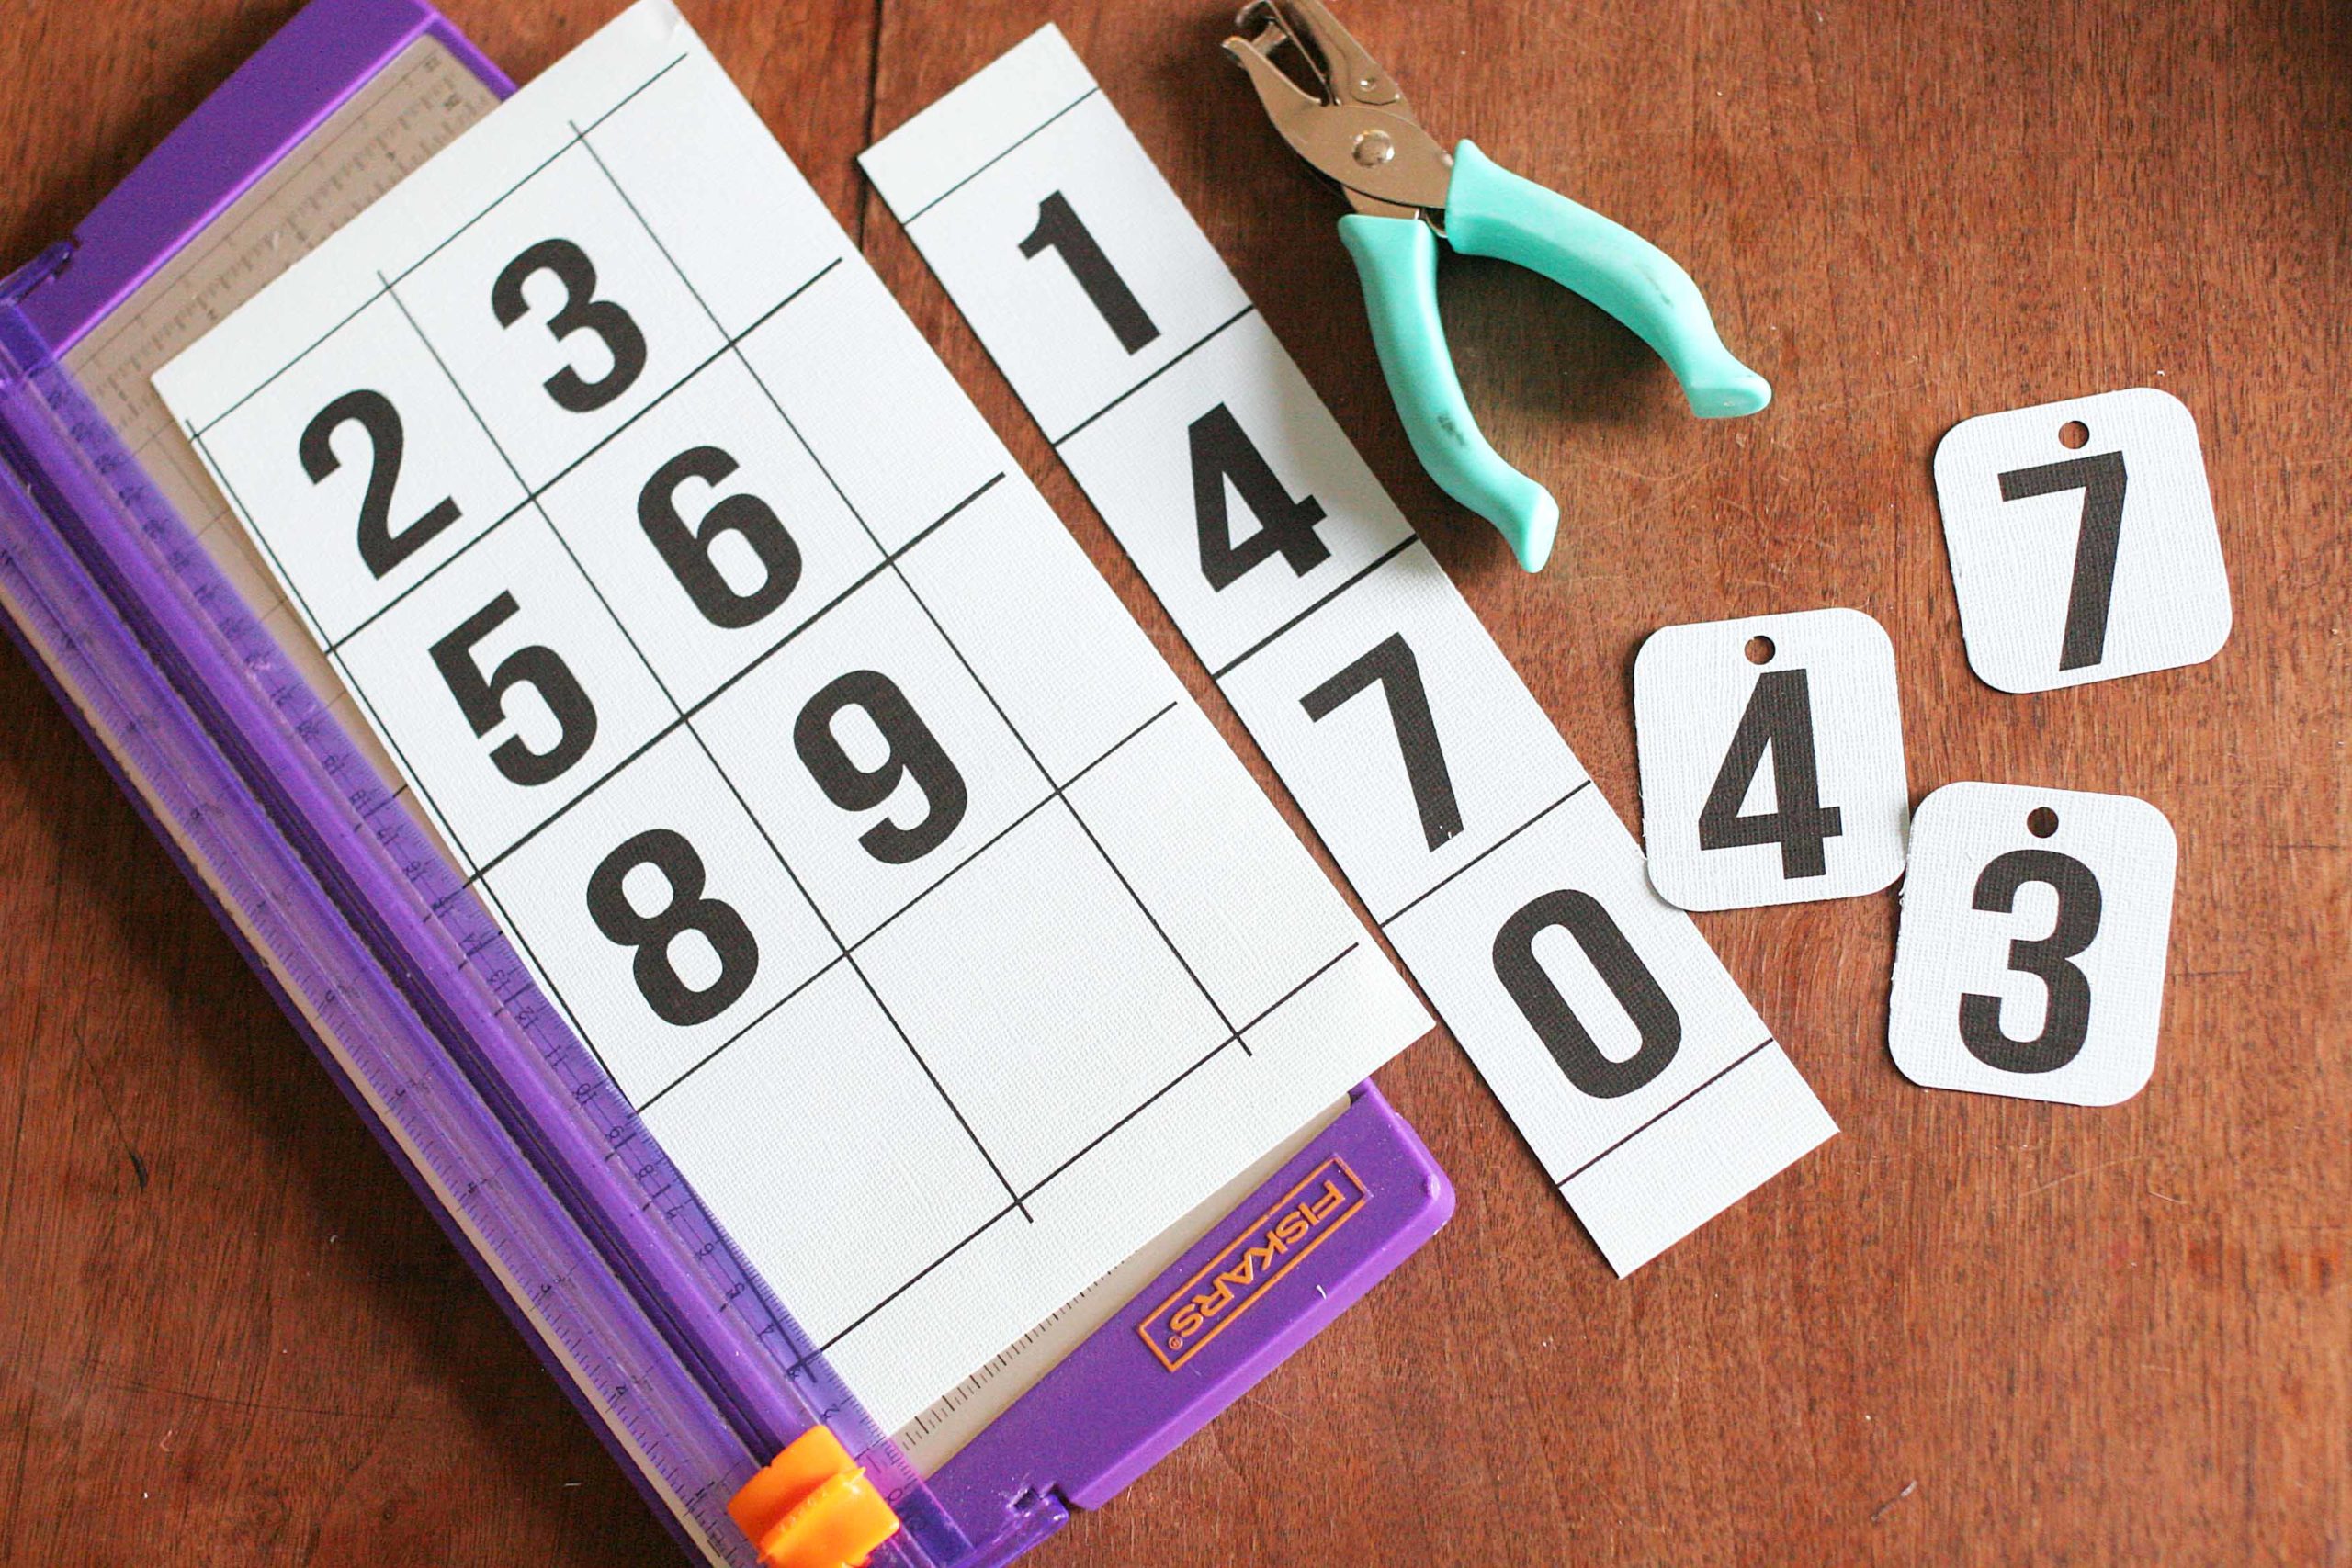
#6: Punch Holes in the Countdown Numbers
In order to prep the numbers for hanging, use a hole punch to add a hole at the center-top of each number.
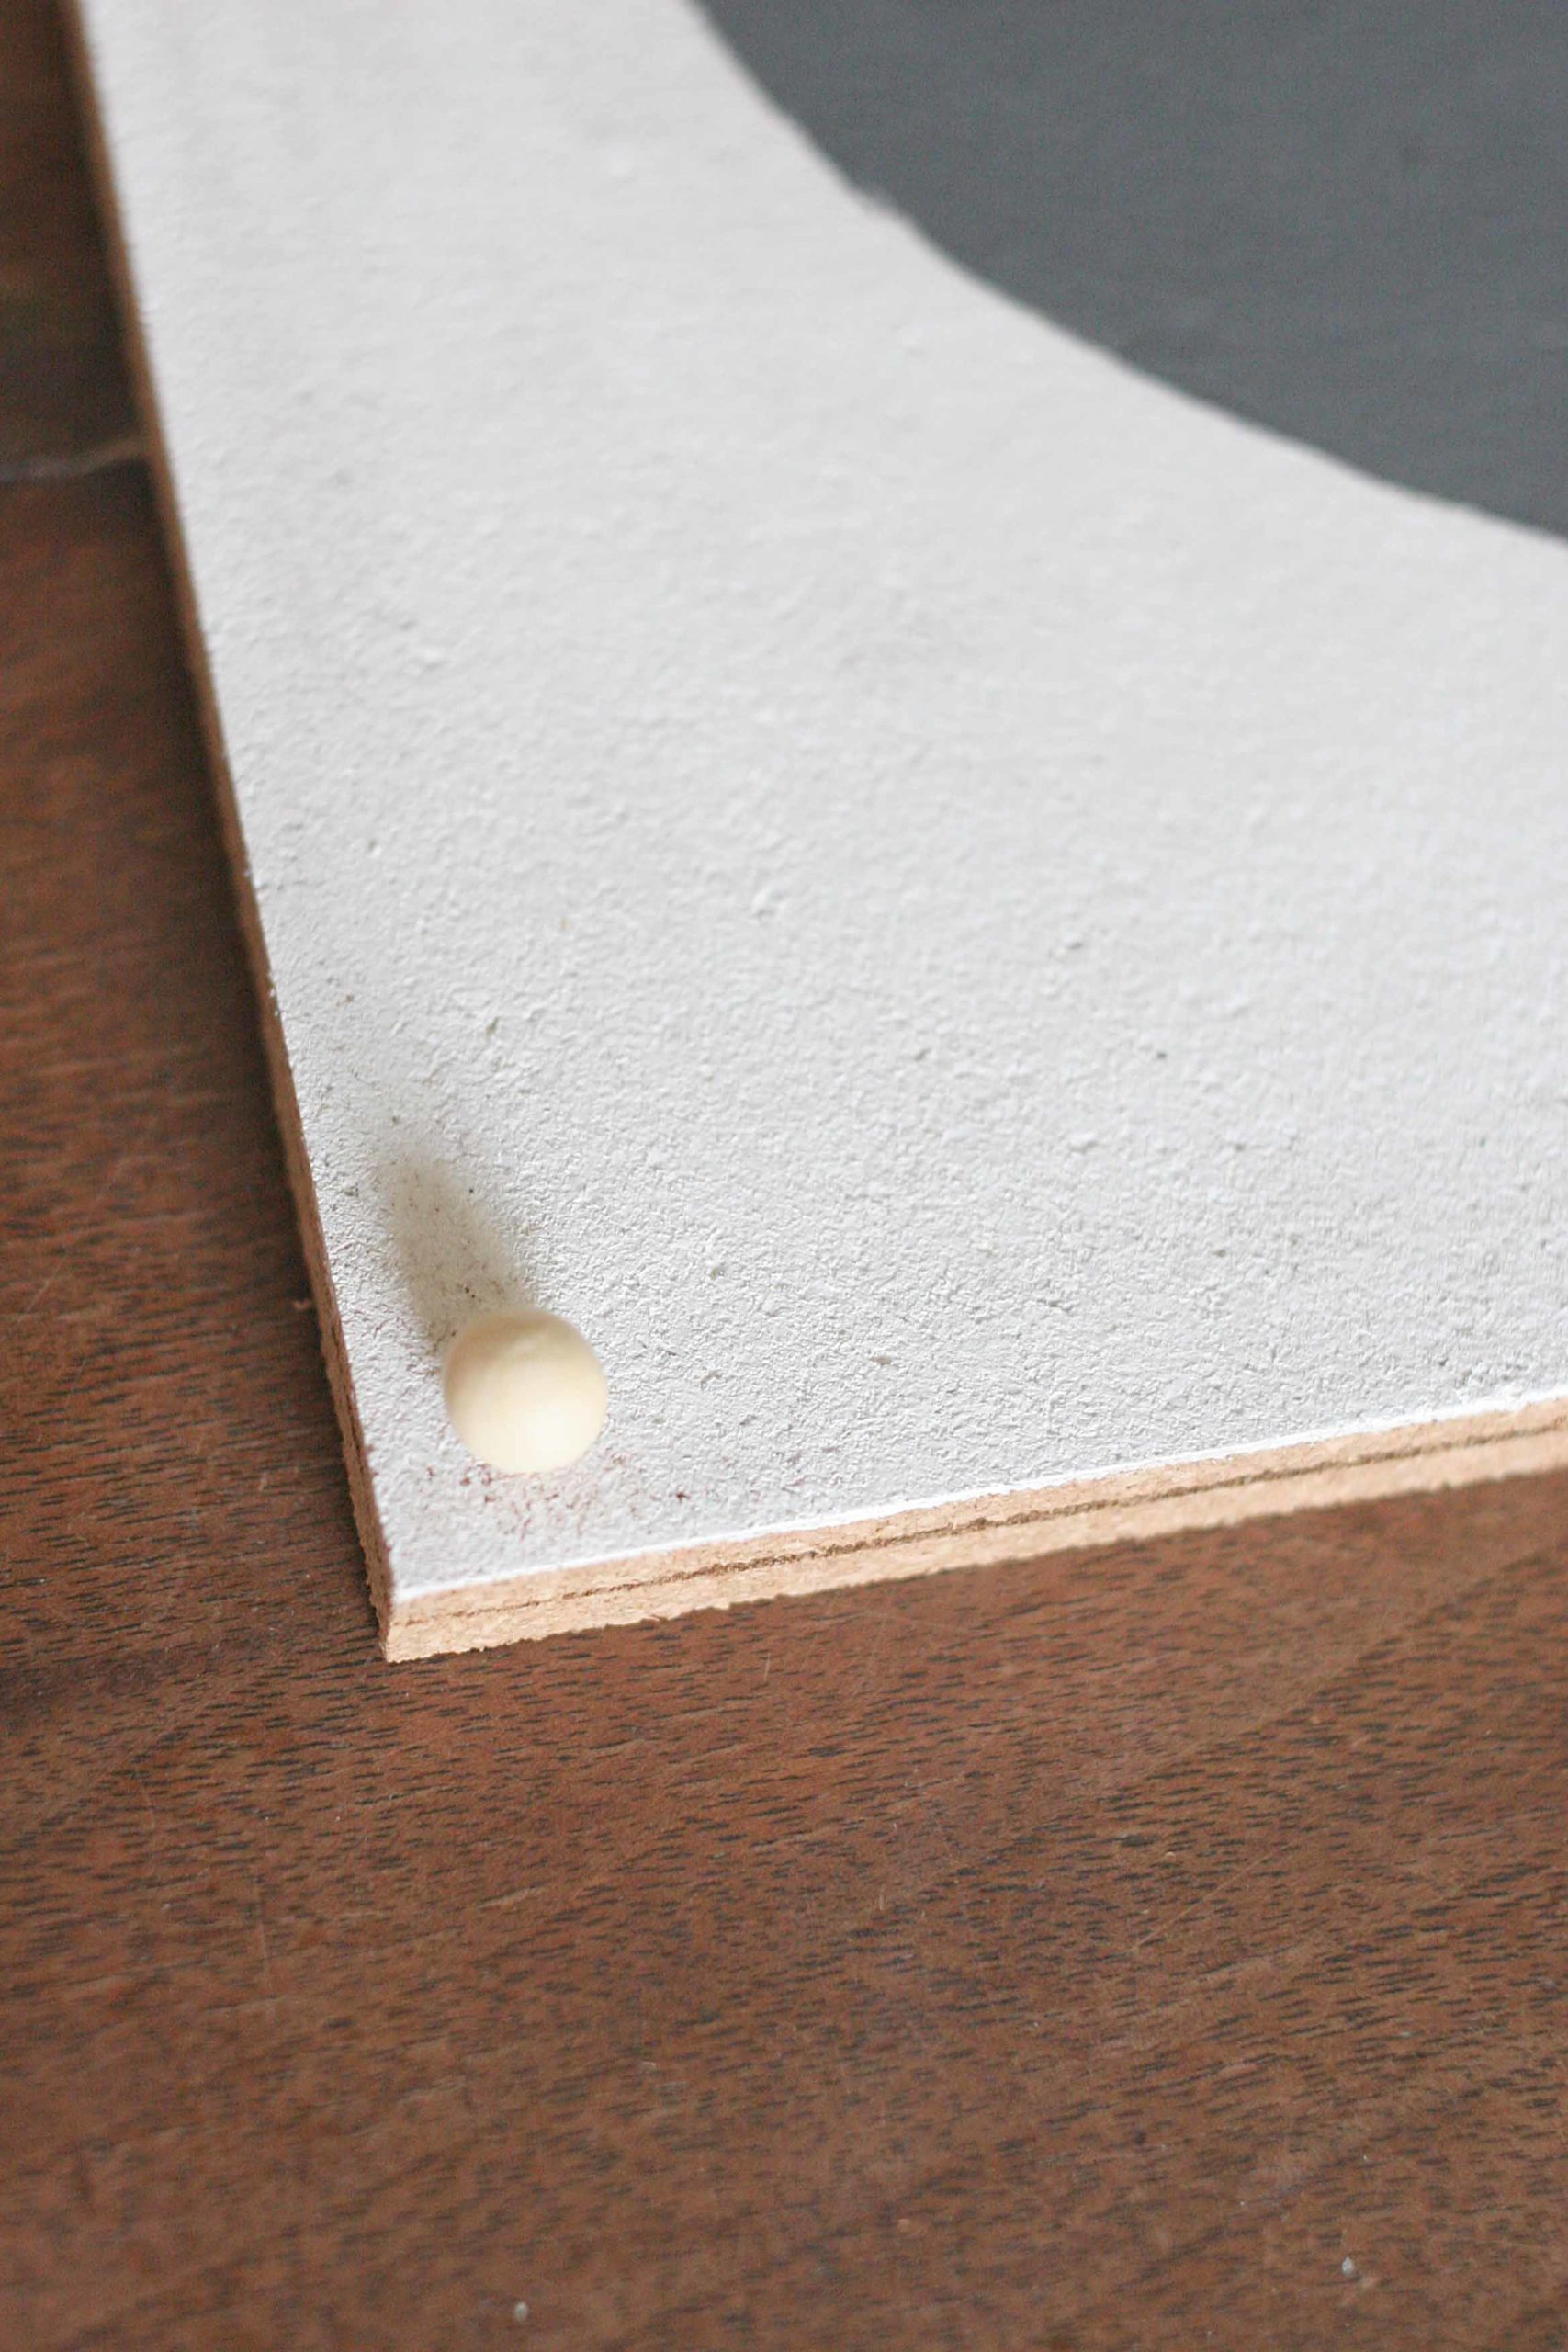
#7: Stack the Cork Tiles
Once the paint is dry, stack the painted cork tile atop another tile. Use four decorative push pins, one in each corner, to attach the cork tiles together.
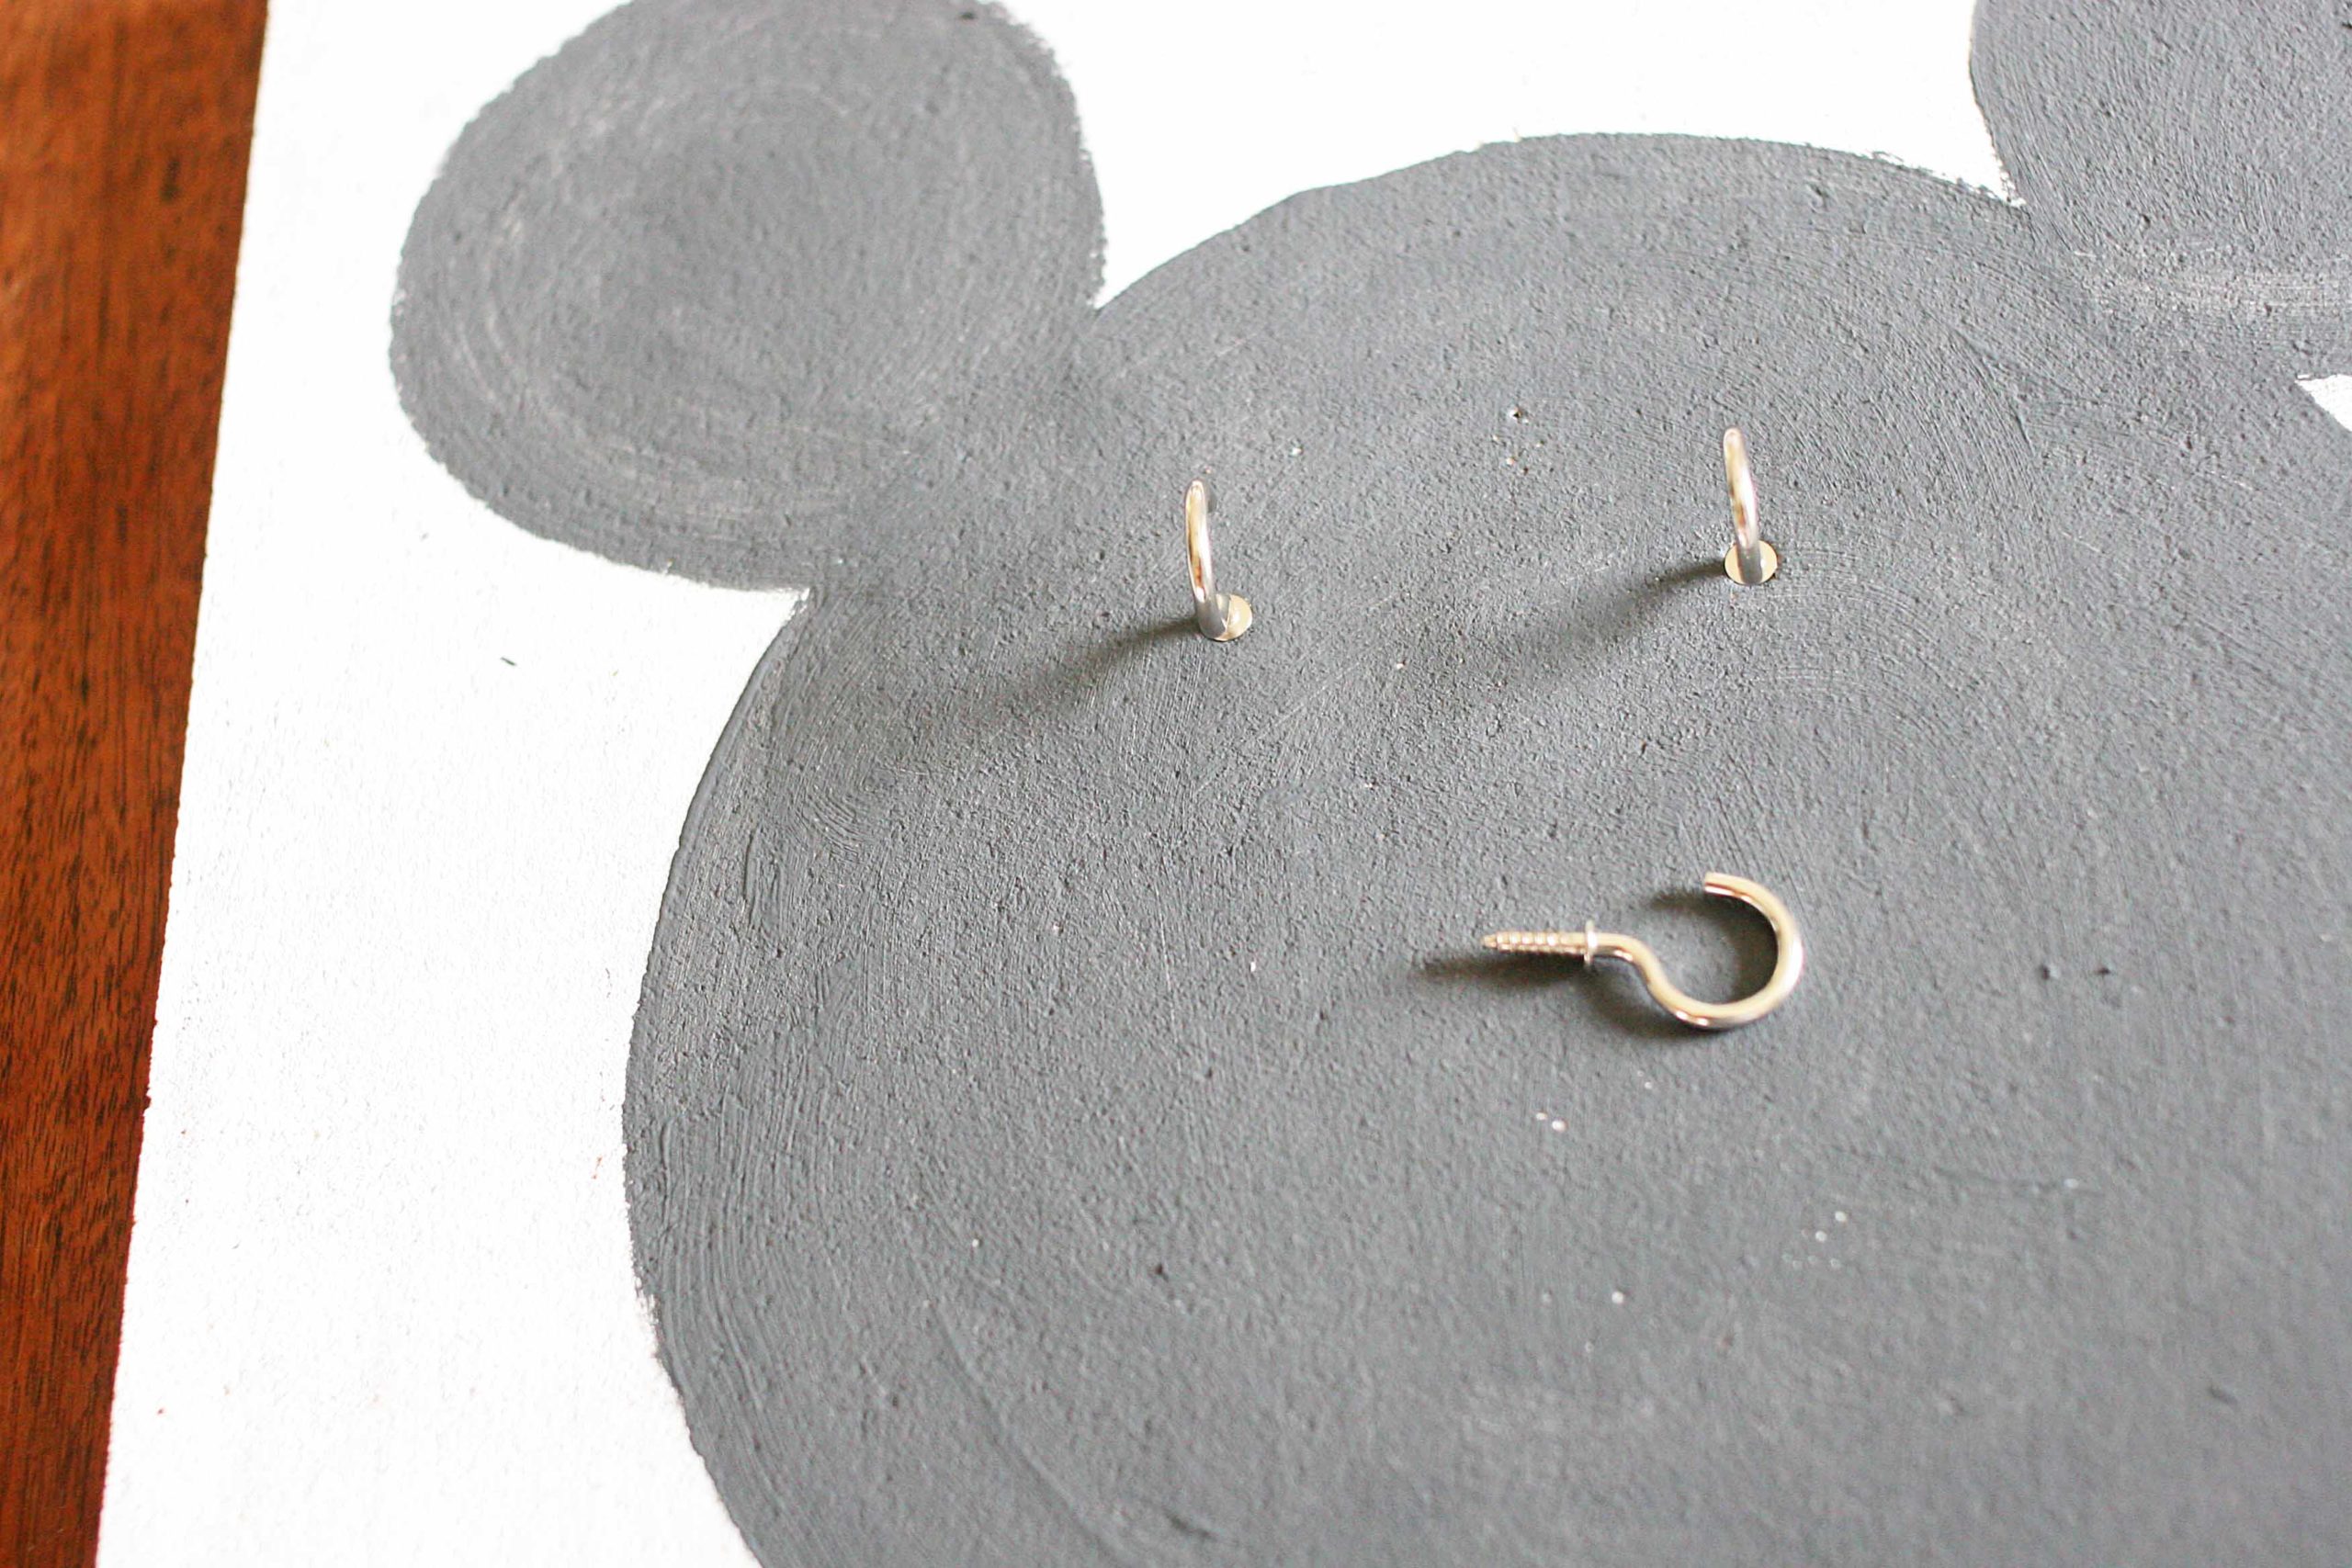
#8: Screw Cup Hooks into the Cork Board
After attaching the tiles together, screw two cup hooks into the painted Mickey face. Hang the tags on the cup hooks.
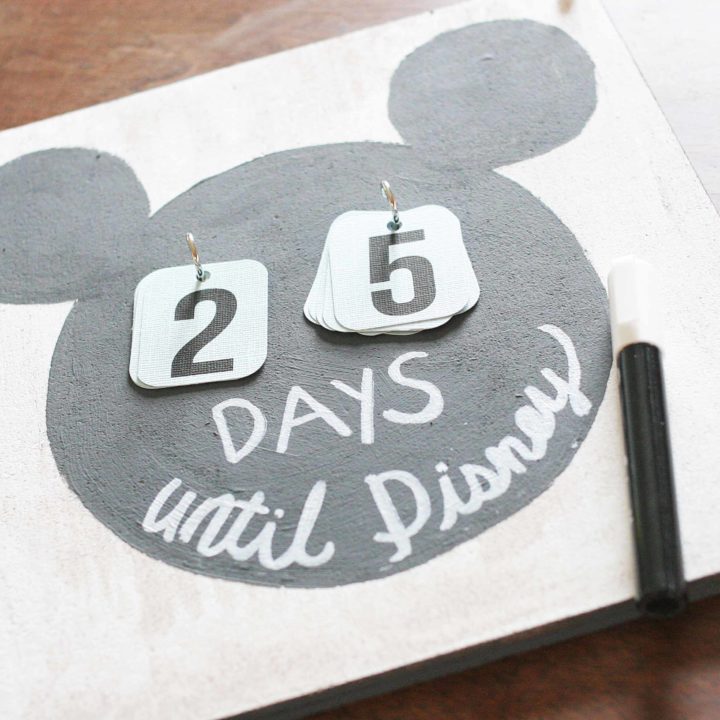
#9: Add the Disney Countdown Message
Once the tags are hung, use a pencil to lightly write “Days Until Disney.” Then, go back over the pencil lines with a chalk marker. Don’t stress about perfection! You can always paint over the chalk marker with black to fix an error.
Note: Don’t skip hanging the tags! Hanging the tags will determine how much space is available for the words “days until Disney.”

Disney Countdown Calendars
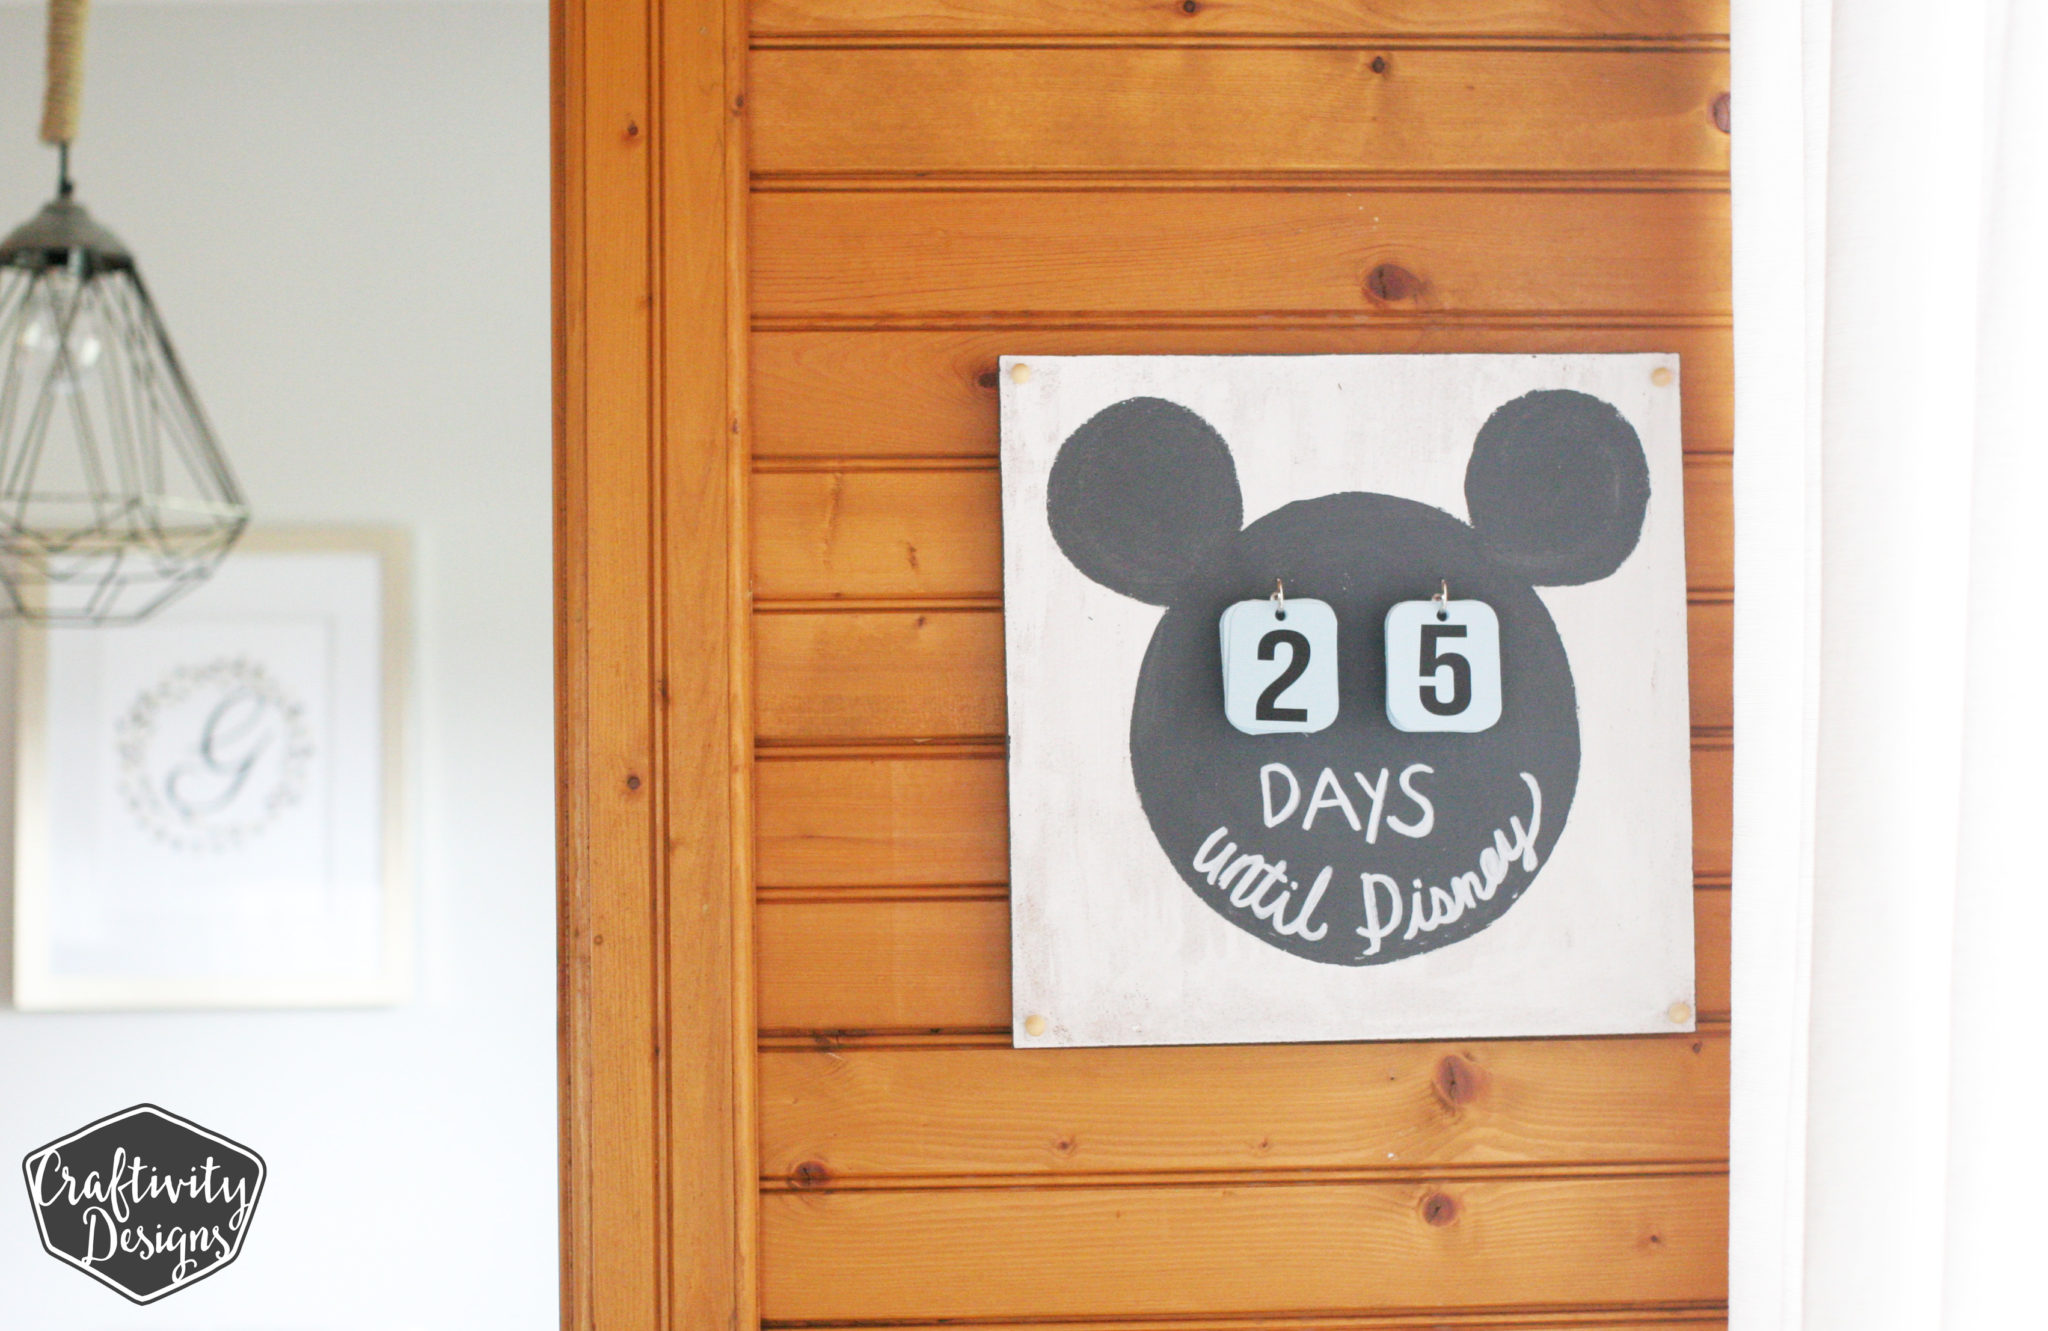
All done! Easy, right? Plus, you can use this calendar year after year (later this summer we’ll be pulling this baby out for it’s 3rd Disney vacation countdown!). Hang it up in the kitchen. family room, or mudroom – somewhere your children will see it daily. They’ll love rotating the tags each day, counting down to the big trip.
If you love the idea of a Disney Countdown Calendar, but want a different look or style, make sure to check out this post with 15 of the best Disney Countdowns for your vacation.
Tips for Planning a Disney Vacation
Countdown calendars build anticipation in the weeks/months leading up to a big vacation. Similarly, there are several other things to do before a Disney vacation to make it that much more memorable.
- Take the stress out of planning by using a Disney travel agent (and, yes, it’s a free service with no strings attached!).
- Print out a map to track the trip with the kids.
- Download free travel games and a travel scavenger hunt for screen-free family time in the car.
- Make a travel kit so that travel games and toys are organized neatly in the car.
How to Make a Disney Countdown Calendar
Learn how to make a Disney Countdown Calendar for your next Disney Vacation. Watch the video tutorial and download the printable to countdown to the trip.
Materials
Tools
- Pencil
- Paper Trimmer (or Scissors)
- Hole Punch
- Corner Rounder
- Salad Plate
- Drinking Glass
- Printer + Ink
Instructions
- Choose one of the 12x12 cork tiles and paint the front white.
- Once the white paint is dry, place a salad plate onto the tile. Use the plate to draw the outline of Mickey's face in pencil.
- Place a drinking glass upside down to draw the outline of Mickey's ears in pencil.
- Use a foam paintbrush, dipped in black paint, to paint Mickey's head. Use the pencil lines as a guide.
- Download and print the countdown numbers (available in this Disney Countdown Calendar post).
- Cut out each number with a paper trimmer or scissors.
- If you'd like, trim the corners with a paper rounder.
- Punch a hole at the top of each number to make tags.
- Stack the painted cork tile atop a second cork tile.
- Use four decorative push pins, one in each corner, to attach the cork tiles together.
- Screw two cup hooks into the painted Mickey face where his eyes would be located.
- Hang the tags on the cup hooks.
- Use a pencil to lightly write “Days Until Disney.”
- Go back over the pencil lines with a chalk marker.
Notes
Don't skip hanging the tags in step #12! Hanging the tags will determine how much space is available for the words "days until Disney."
Like this Disney Countdown Calendar? Pin it to Save it!