Learn how to paint an arch on a wall with this step-by-step DIY tutorial. Utilizing a string and pencil method for precision, discover how to determine the width, center, and shape of your arch before applying painter’s tape and paint.
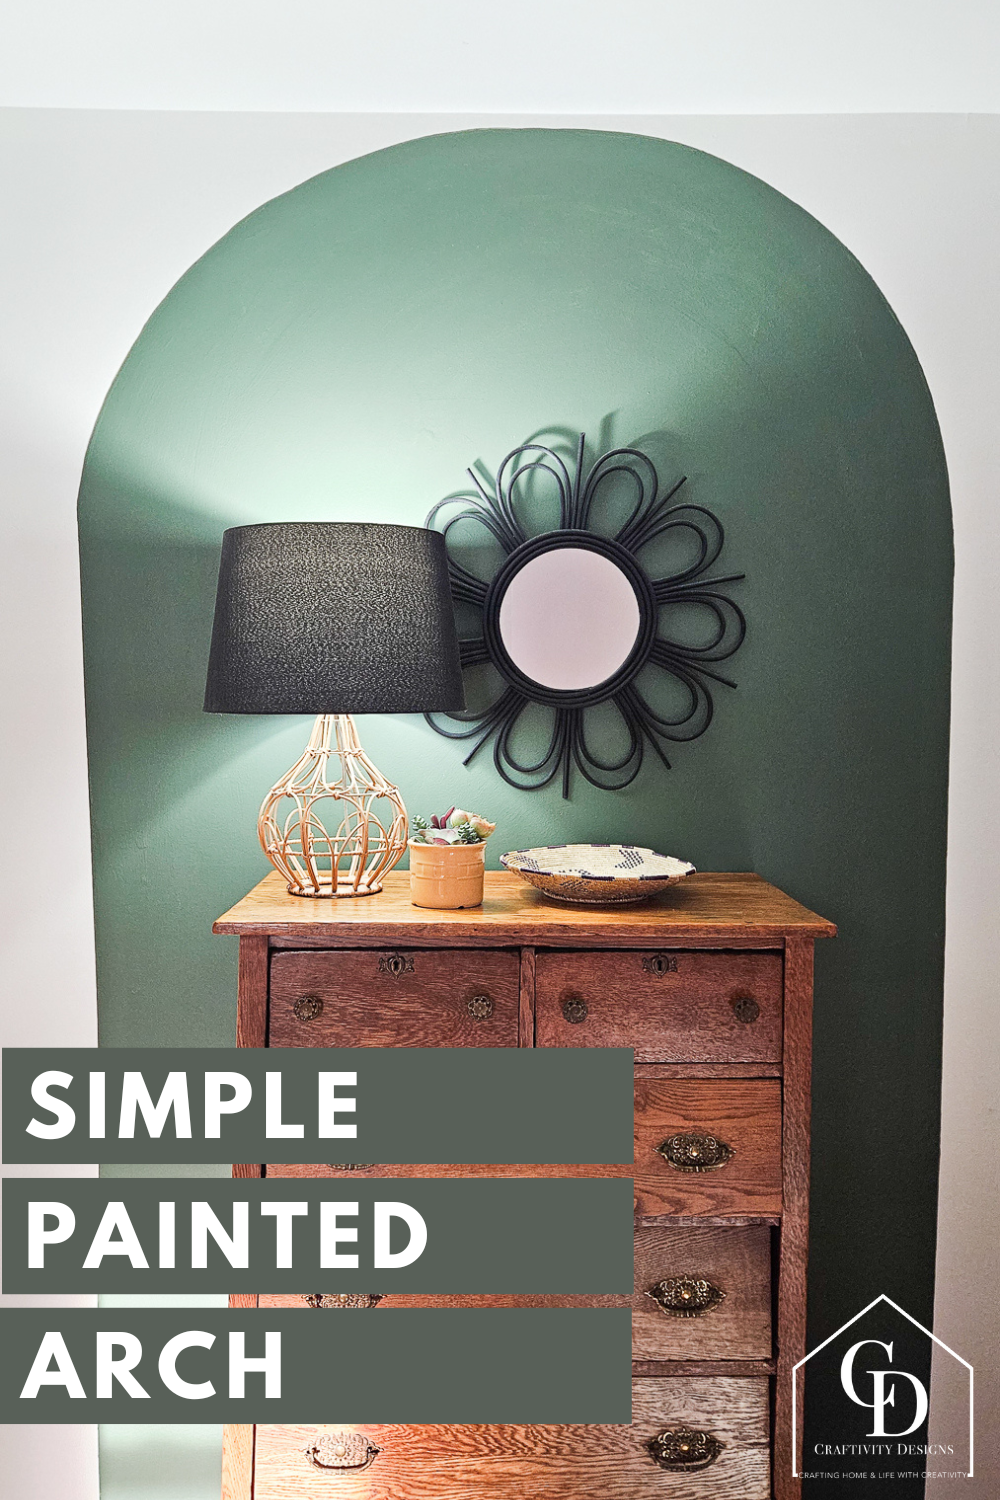
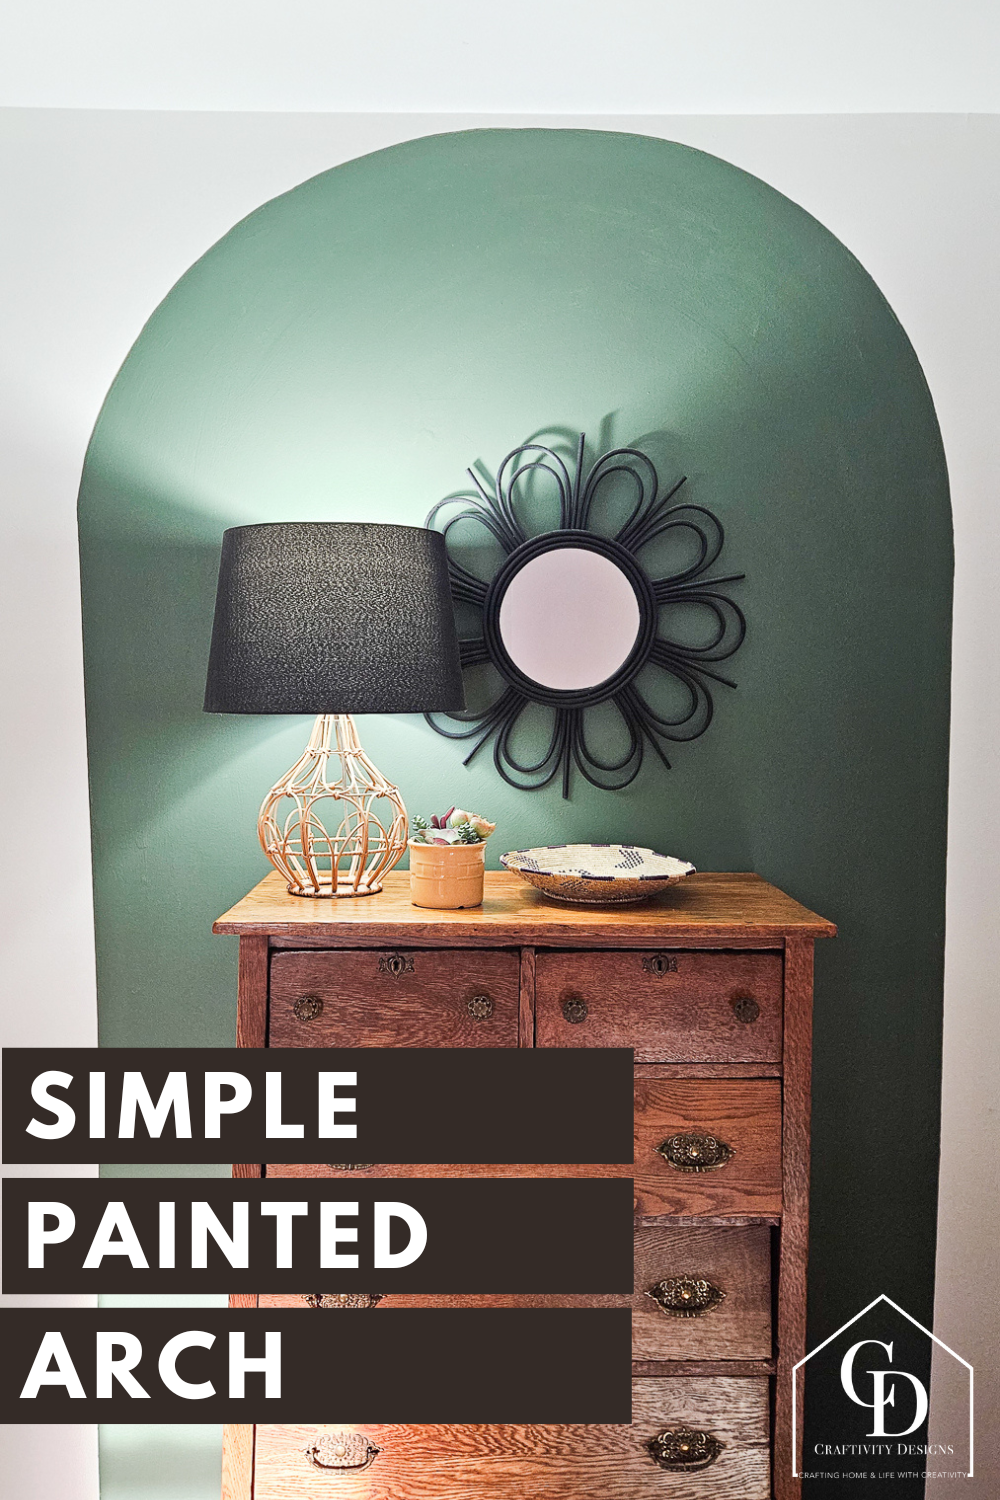
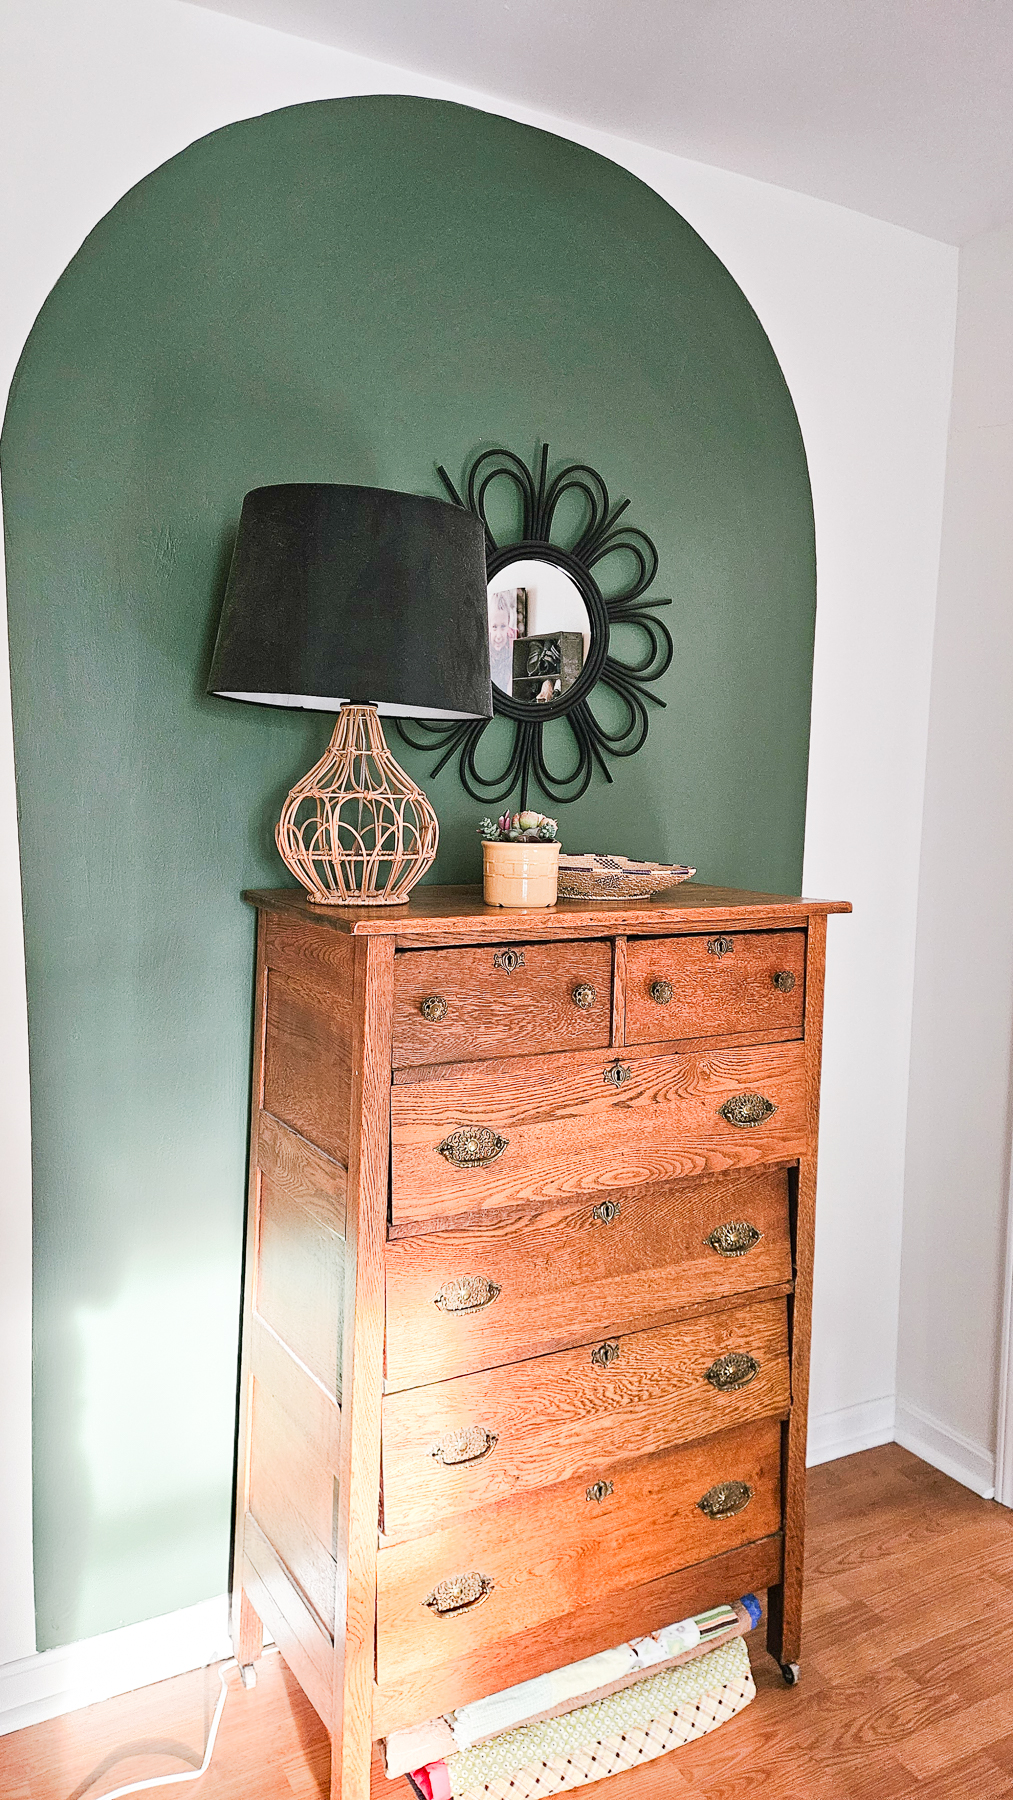
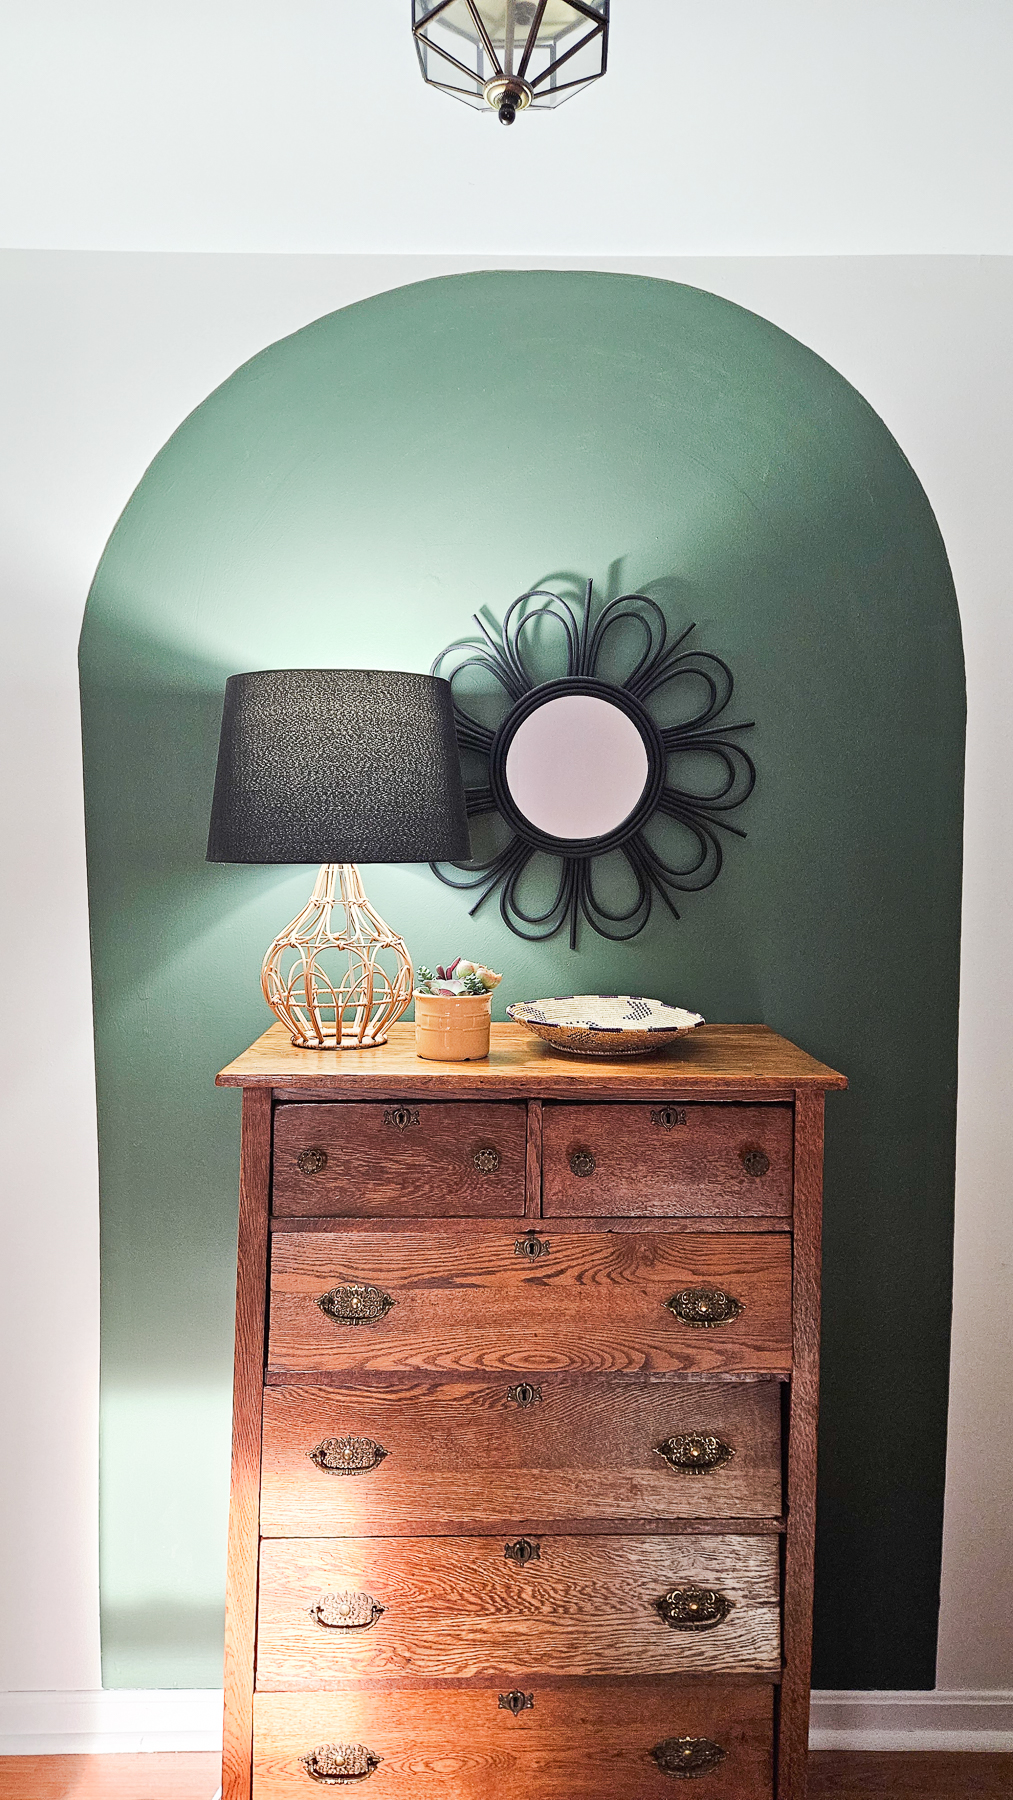
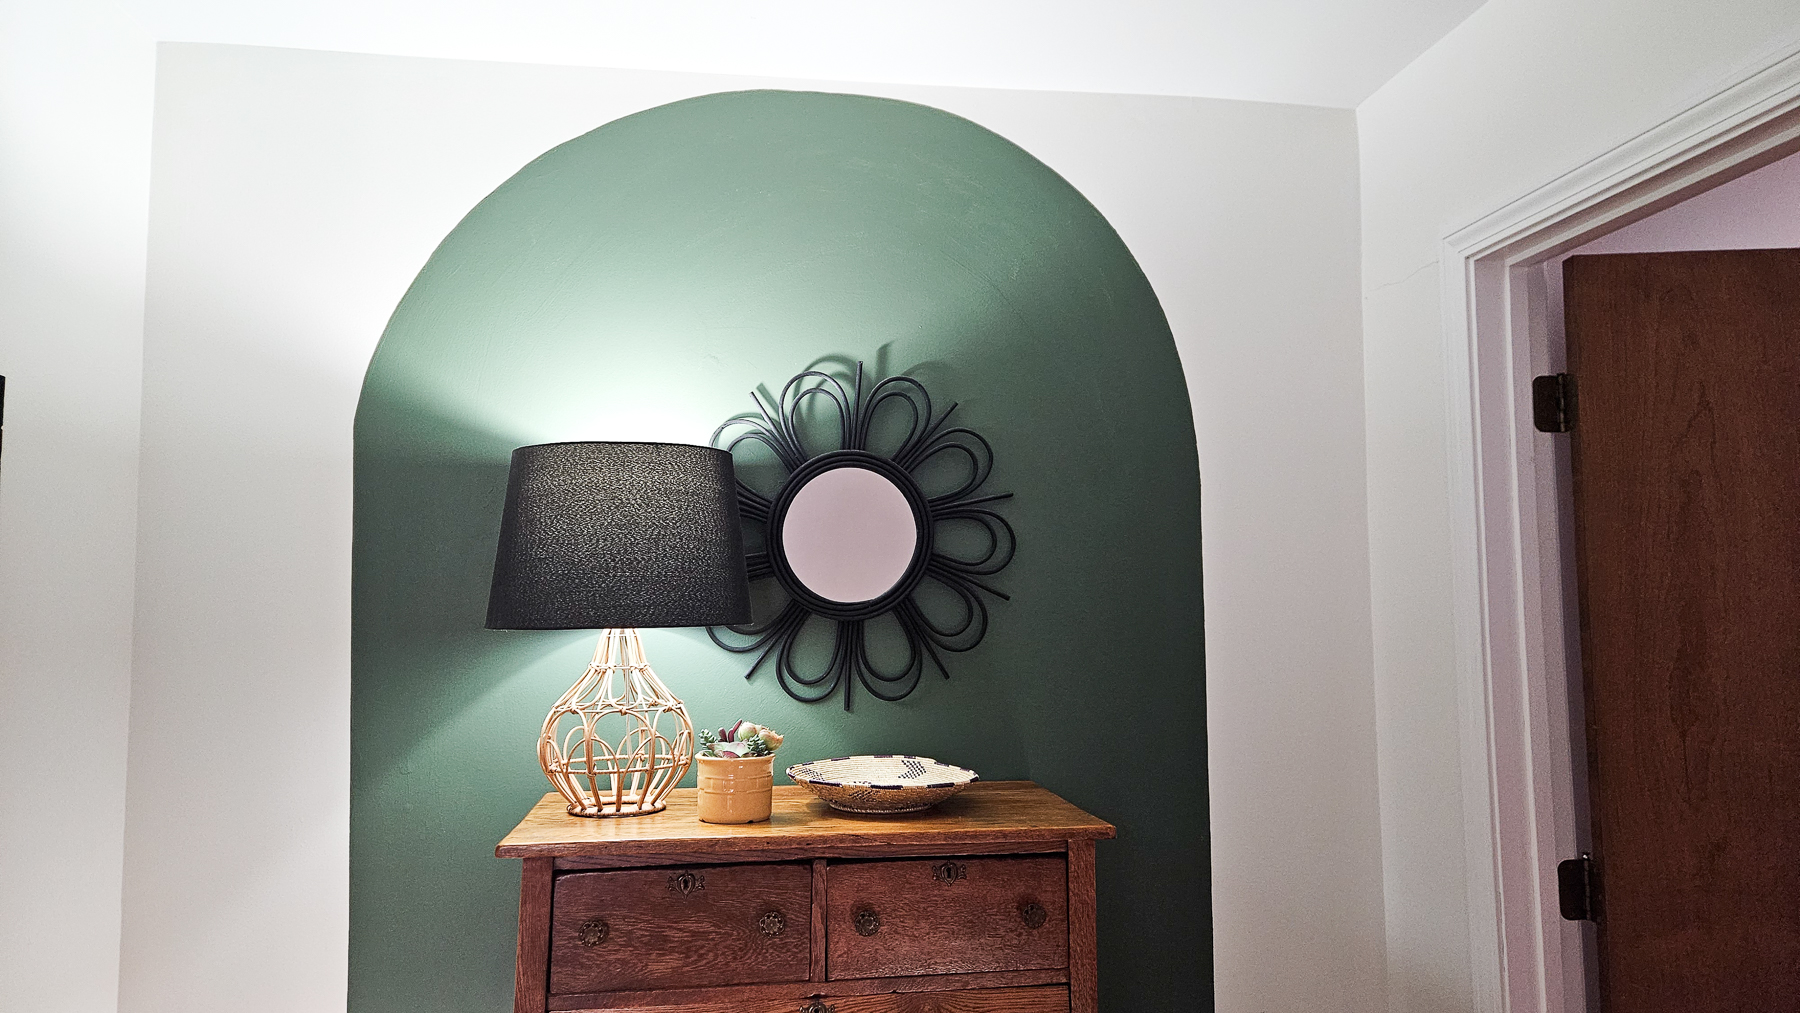
Over the weekend, I tackled a project that has been on my wish list for quite some time. The project cost me nothing – since I used leftover paint and supplies that we already owned – and the entire project took only a few hours. This simple DIY project, a painted arch, completely transformed the landing at the top of our stairs and highlights the pretty antique dresser.
If you’re looking for a quick and easy way to create a beautiful accent wall, I’d recommend that you consider a painted arch. I’ve created several other accent walls in our home (such as with natural grasscloth wallpaper and a navy blue peel-and-stick wallpaper ADD LINK) and I have to say this painted arch easily wins as the simplest DIY project (yes, even easier than peel-and-stick!).
Disclosure: This page includes affiliate links.
Painted Arch on a Wall
Several years ago, I started decorating the loft area in our home. At the top of the main stairwell, we have a spacious area where my kids can play or hang out.
Not one to finish rooms in one-fell-swoop, I tend to let rooms marinate in my mind for a while. I completed part of our loft, installing the heavy duty bookshelves and making our DIY travel map, but I wasn’t quite sure how I wanted to finish the space.

I’d been pondering the idea of an arch for awhile and finally put that idea into action. It did exactly as I hoped:
- highlights our antique dresser
- creates a focal wall at the top of our stairs
- ties together a modern, colorful space designed for kids
Plus, I was able to knock this project out in only few hours. My favorite DIY projects are those with big impact in a short amount of time (like our german schmear brick fireplace).
Painted Arch Ideas
Painted arches can be a versatile and visually striking addition to your home decor. Here are a few ideas on how you could incorporate them in your own home:
- Accent Wall: Use a painted arch to create a focal point in any room. As an accent wall, a diy painted arch will draw the eye towards that location in a room.
- Behind a Dresser: Highlight a piece of furniture, such as an antique dresser, by painting an arch on the wall.
- Headboard: No headboard? No problem. Paint an arch on the wall in lieu of a headboard.
- Behind a Desk: Is your “office” simply a desk in your living room, family room, bedroom, or kitchen? Paint an arch behind the desk to make it feel like it’s own little office space within a larger room.
- Overlapping Arches: Let those artistic juices flow by overlapping arches, circles, and other simple, graphic shapes on a feature wall.
- Behind Shelves or Mirrors: Anchor smaller shelves or mirrors by painting an arch on the wall. The arch makes petite wall shelves and standard mirrors feel larger and more substantial – making them a true feature in a room.
- Entryway: Create an entryway where there is no formal entry by using a painted arch. The arch draws the eye toward the entry space, making it feel like it’s own little entry nook.
- Behind a Couch: Don’t want to splurge on huge art for above the sofa? It’s always hard to find the right size artwork for over a couch. Instead, paint arches as “art” for over the couch.
How to Paint an Arch on the Wall
If you’d like a to print the tutorial, use the How-To card at the end of this post. The How-To card includes a list of tools and materials for the project, as well.
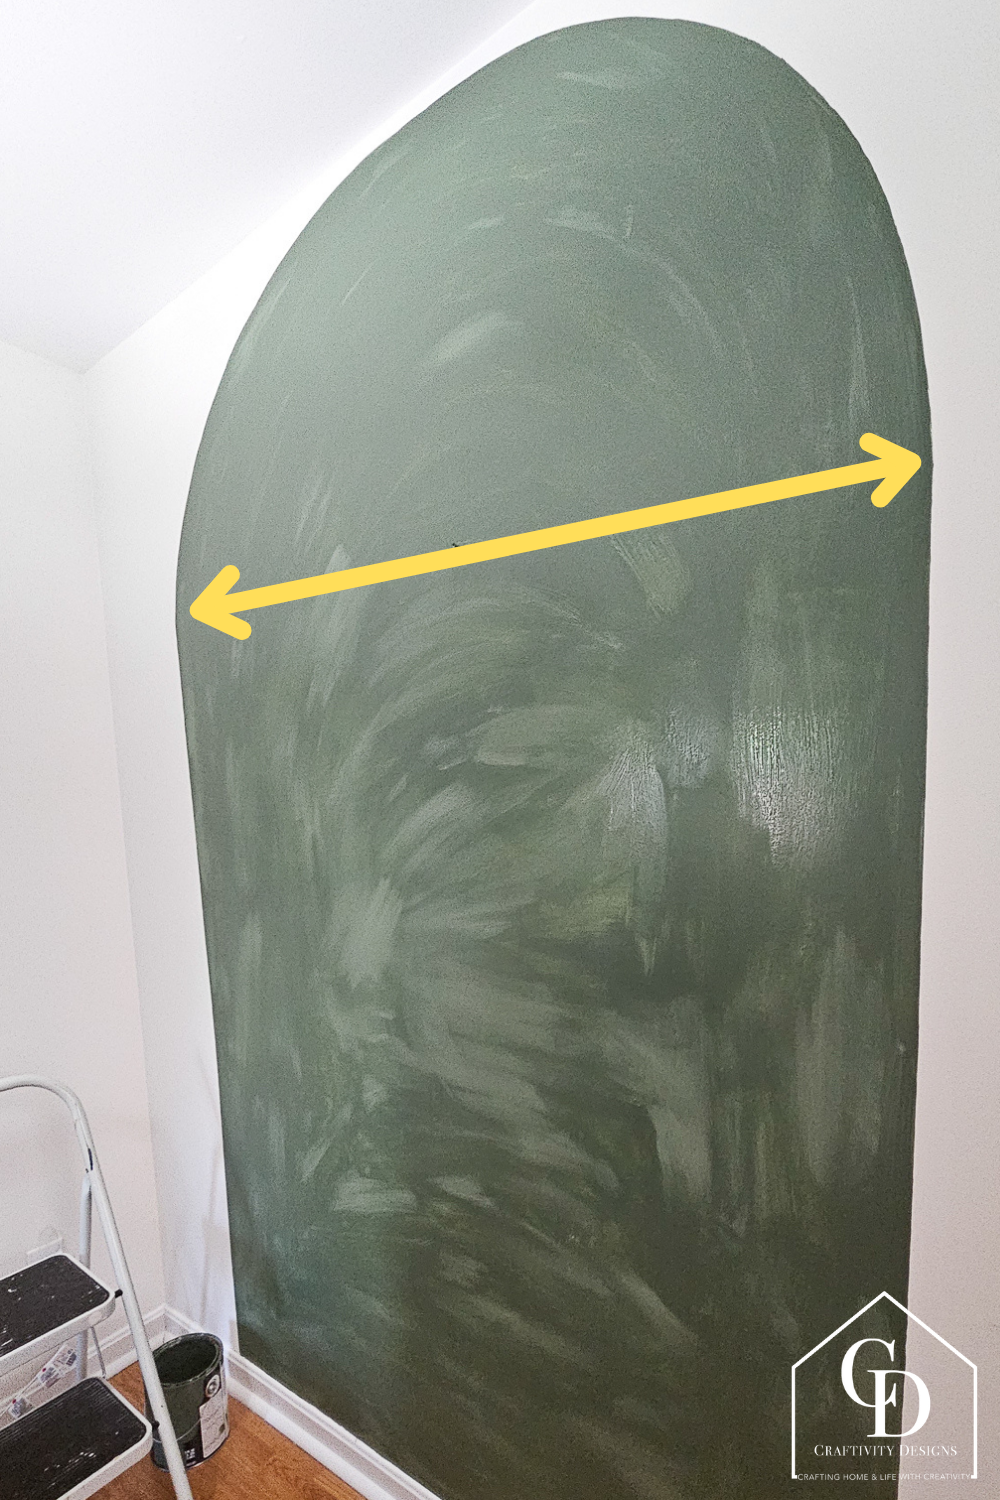
1. Determine the Width of the Arch
Measure and decide how wide you want the arch to be. This measurement will determine the overall scale and impact of the arch. Mark the two points on the wall which represent the width. Those two points are noted in the image, below. Also, note the radius of the arch which is half the distance measurement.
Example: If the arch is 50 inches across, then the radius in 25 inches.
For our painted arch, I wanted it to be wider than an antique dresser located at the top of our stairway.
2. Determine the Height of the Arch
Decide how high up the wall the arched portion – or half circle – should start. Mark this height on the wall. Refer to the image, below, for the height up to the arched portion.
If you’d like the top of the arch to be near the ceiling, a good reference point is approximately 1/3 of the distance from the ceiling.
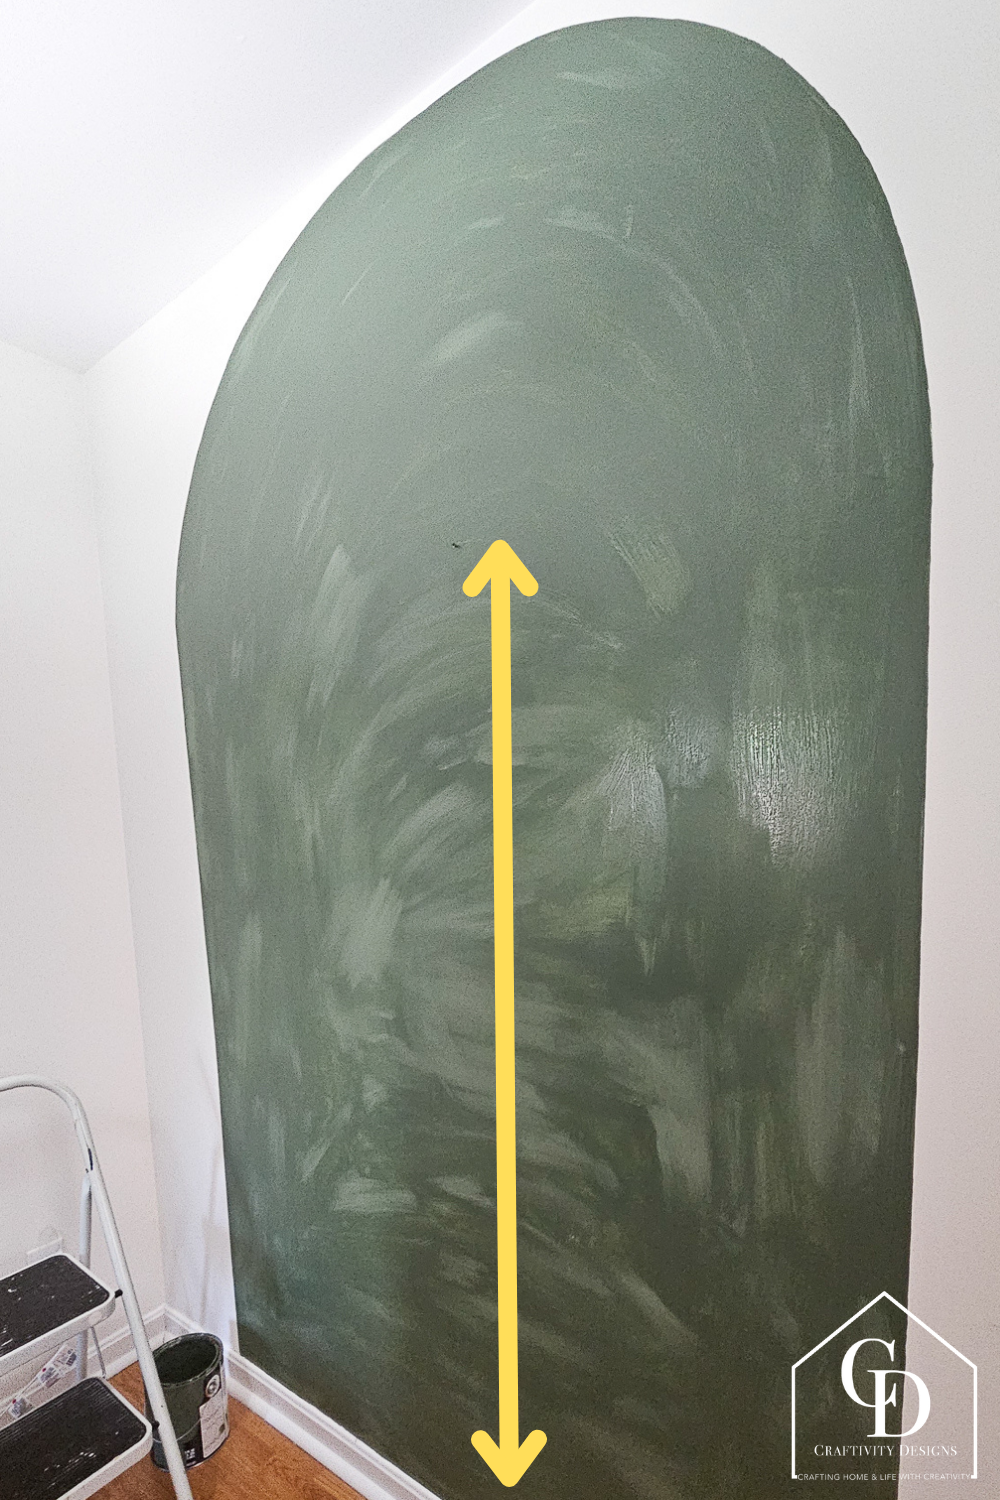
Make sure that the distance from this point, to the ceiling, is GREATER THAN the arch’s radius (from step 1). If not, the arch will extend onto the ceiling. See the image below, as an example.
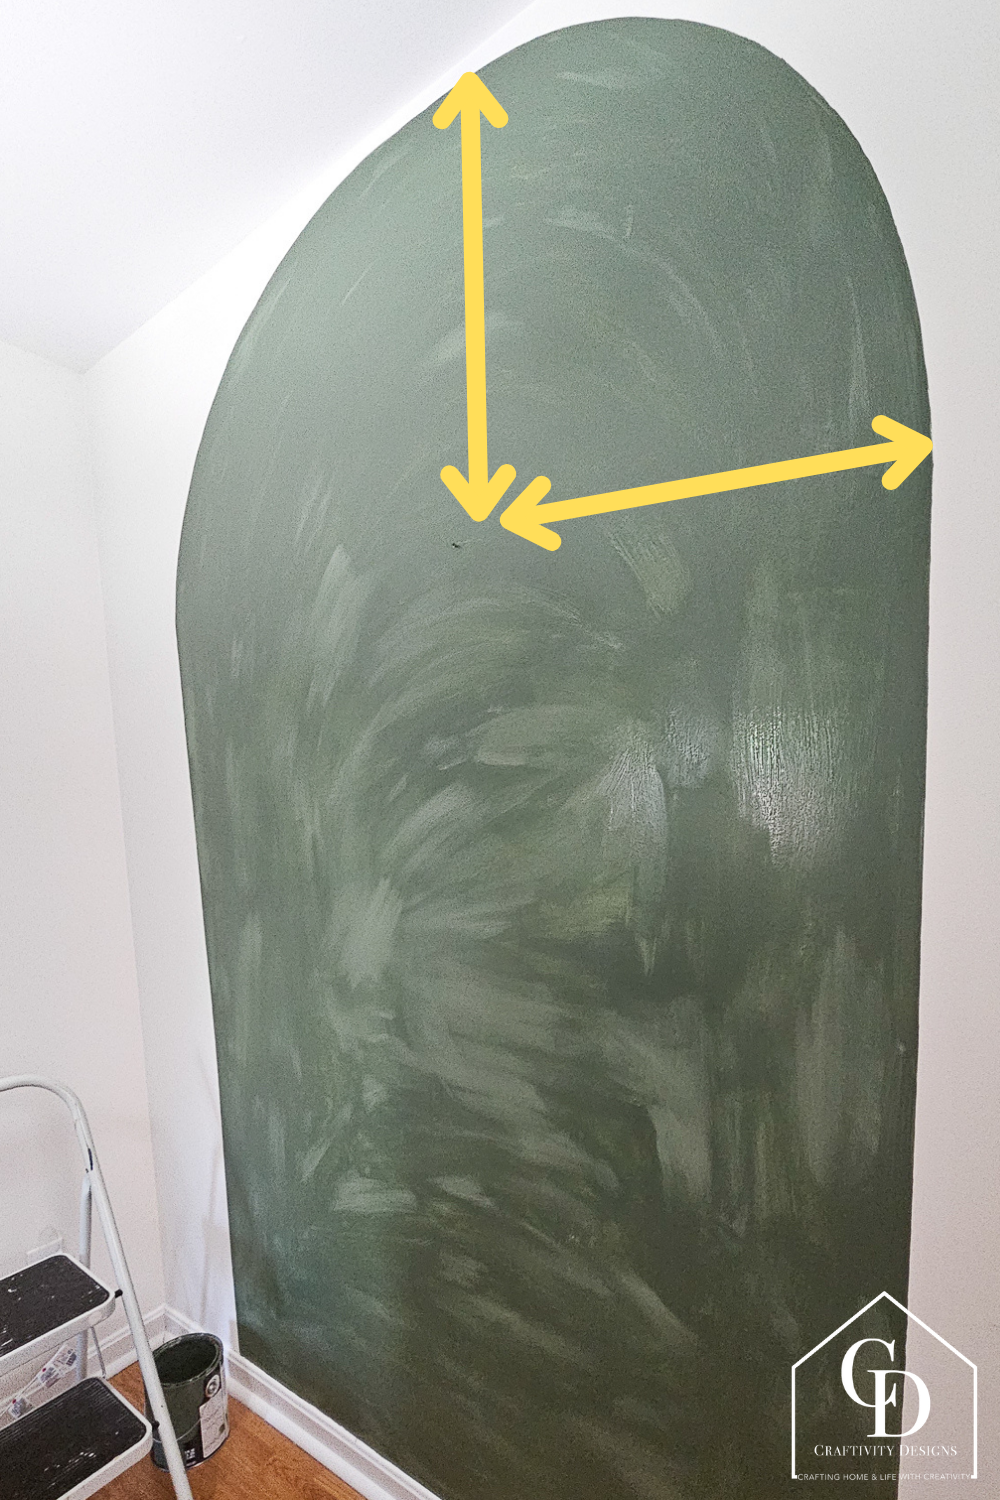
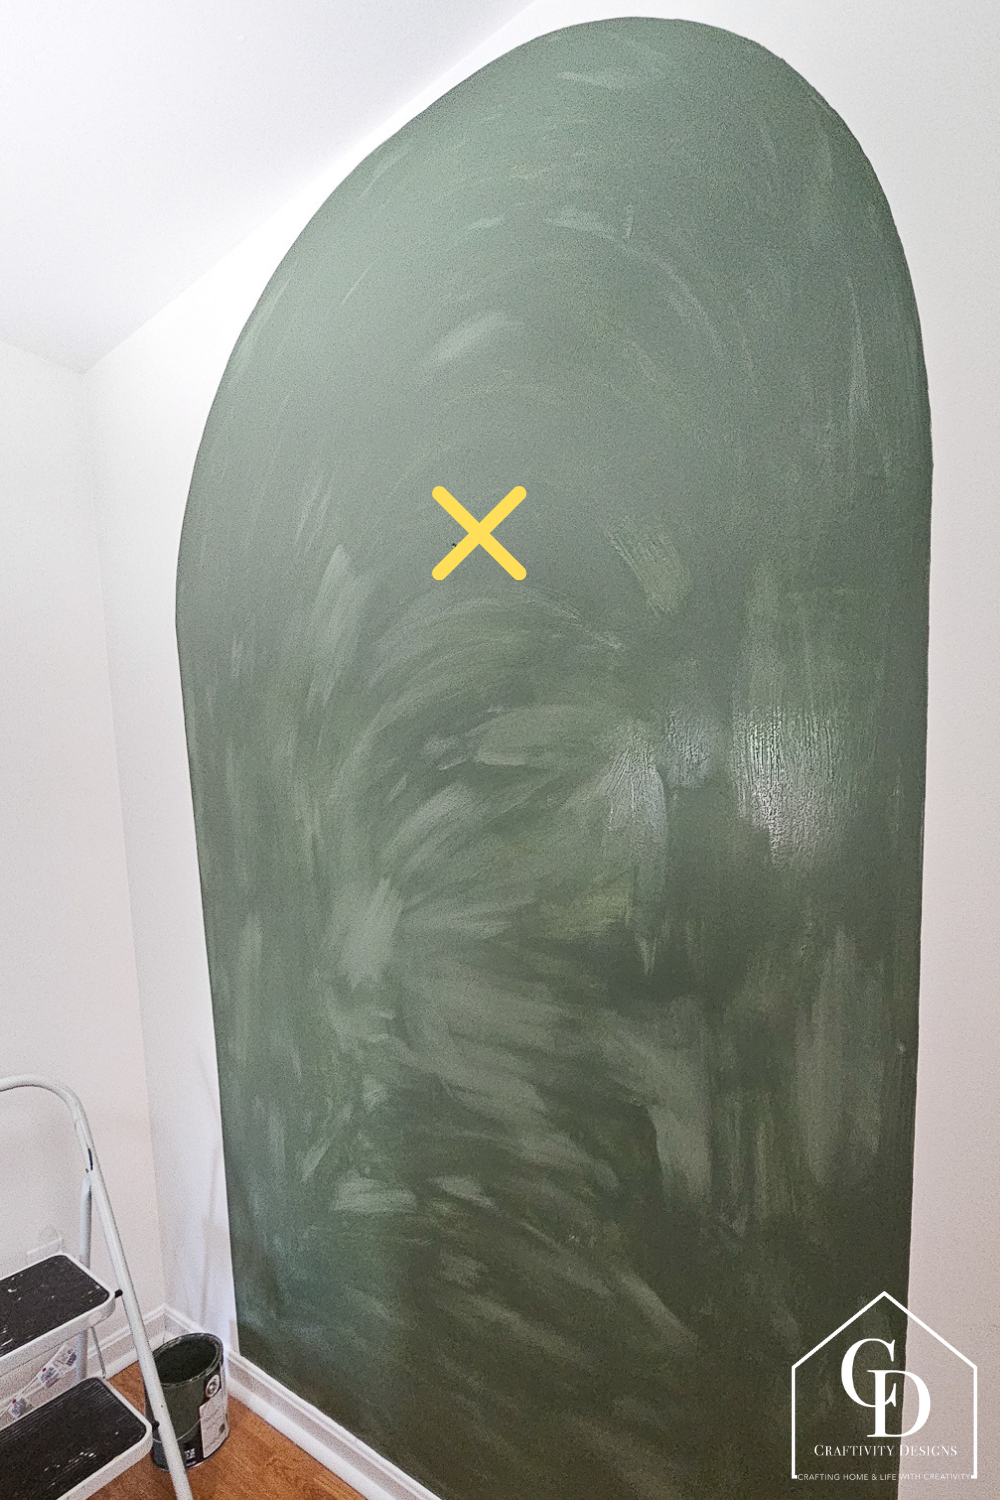
3. Find the Center of the Arch
The center point of the arch is crucial for symmetry. Measure half the width or radius (from step 1) and mark this point at the height determined in step 2.
This is the center of the arched portion. Insert a thumbtack at the center point. The thumbtack will act an anchor point for drawing the arch.
4. Draw the Arch
Cut a piece of string. Tie one end of the string around the thumbtack and the other end to a pencil, with an approximate distance of the radius (from step 1) minus the length of pencil.
Example: If the radius of the arch is 25 inches and the pencil is 7 inches, then the string should be about 18 inches from thumbtack to pencil.
This doesn’t have to be exact! The purpose of the measurements is to determine the general size of the arch, the string plus pencil length does not have to be perfect, just close.
Keeping the string taut, lay the pencil nearly flat against the wall and draw a half-circle from one side of the arch to the other. This will form the curved top of the arch.
5. Apply Painter’s Tape
Once the arch is marked, place painter’s tape along the vertical edges up to the arched portion (this should be approximately the height measured in step 2).
The painter’s tape will help to maintain clean, straight lines for the sides of the arch.
6. Paint the Arch Outline
Using a brush to cut-in, carefully follow the penciled half-circle line. Paint the curved top of the arch freehand with the pencil line as a guide. Take your time to ensure smooth, precise lines.
7. Fill in the Arch with Paint
Once the outline is done, use a regular paintbrush or roller to fill in the arch area. When painting the straight vertical sides of the arch, brush inwards over the edge of the painter’s tape as opposed to brushing towards the tape. This tip will help to ensure a clean, crisp edge.
8. Apply Additional Coats
As soon as the paint is dry to the touch, apply additional coats until there is complete coverage. Remove the painter’s tape while the final coat is still slightly wet to prevent the paint from peeling and to leave a smooth, crisp line.
FAQs
Select a typical wall paint sheen, such as satin or eggshell. If you are painting over a dark color, make sure to choose a high-quality paint with good coverage or built-in primer.
This project, with the dry time between paint coats included, will take less than 4 hours. The active working time is approximately 1 hour.
In order to prevent bleeding, make sure to brush in from the painter’s tape as opposed to toward the painter’s tape. This will prevent bleeding and minimize or eliminate touch-ups.


How to Paint an Arch
Learn how to paint an arch with this comprehensive guide which includes the tools, supplies, and instructions to finish the project quickly (and how to get clean, crisp paint lines, too!).
Materials
- Thumbtack
- String
- Painter's Tape
- Paint
Tools
- Measuring Tape
- Pencil
- Paintbrush
- Paint Roller & Frame
Instructions
- Measure and decide how wide you want the arch to be. This measurement will determine the overall scale and impact of the arch. Mark the two points on the wall which represent the width. Also, note the radius of the arch which is half the distance measurement. Example: If the arch is 50 inches across, then the radius in 25 inches.
- Decide how high up the wall the arched portion - or half circle - should start. Mark this height on the wall. If you'd like the top of the arch to be near the ceiling, a good reference point is approximately 1/3 of the distance from the ceiling. Make sure that the distance from this point, to the ceiling, is GREATER THAN the arch's radius (from step 1). If not, the arch will extend onto the ceiling.
- The center point of the arch is crucial for symmetry. Measure half the width or radius (from step 1) and mark this point at the height determined in step 2. This is the center of the arched portion. Insert a thumbtack at the center point. The thumbtack will act an anchor point for drawing the arch.
- Cut a piece of string. Tie one end of the string around the thumbtack and the other end to a pencil, with an approximate distance of the radius (from step 1) minus the length of pencil. This doesn't have to be exact! The purpose of the measurements is to determine the general size of the arch. Therefore, the string plus pencil length does not have to be perfect, just close. Example: If the radius of the arch is 25 inches and the pencil is 7 inches, then the string should be about 18 inches from thumbtack to pencil.
- Keeping the string taut, lay the pencil nearly flat against the wall and draw a half-circle from one side of the arch to the other. This will form the curved top of the arch.
- Once the arch is marked, place painter's tape along the vertical edges up to the arched portion (this should be approximately the height measured in step 2).
- Using a brush to cut-in, carefully follow the penciled half-circle line. Paint the curved top of the arch freehand with the pencil line as a guide. Take your time to ensure smooth, precise lines.
- Once the outline is done, use a regular paintbrush or roller to fill in the arch area. When painting the straight vertical sides of the arch, brush inwards over the edge of the painter's tape as opposed to brushing towards the tape. This tip will help to ensure a clean, crisp edge.
- As soon as the paint is dry to the touch, apply additional coats until there is complete coverage. Remove the painter's tape while the final coat is still slightly wet to prevent the paint from peeling and to leave a smooth, crisp line.
If you liked this wall decor idea, you may also like:
- Pink Wallpaper for a Girl’s Bedroom
- 8 Free Hawaiian Art Prints (Large-Scale Beach Art)
- Jungle Wallpaper in a Small Bathroom
Want to save this DIY painted arch tutorial? Pin it!